Prep Time: 10 minutes | Cook Time: 5 minutes | Total Time: 15 minutes | Serves: 6-8
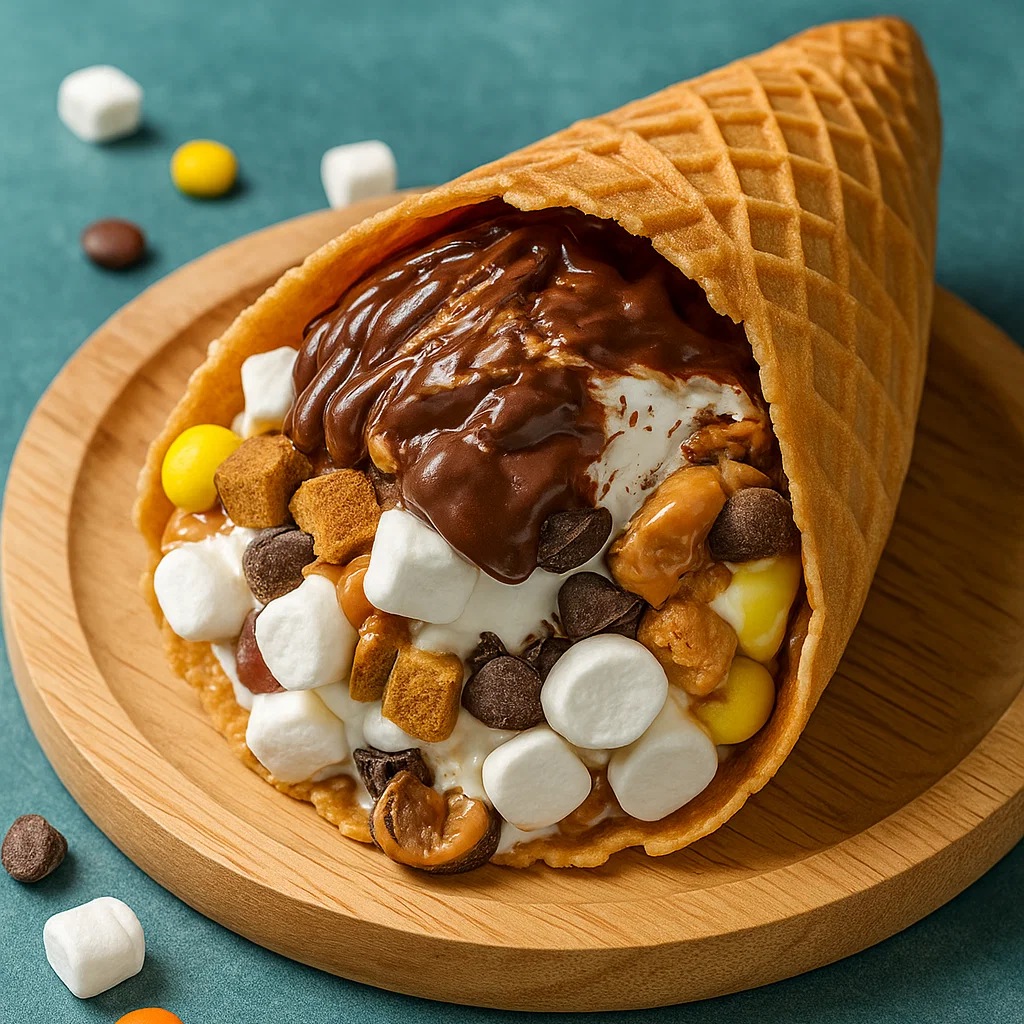
Get ready to revolutionize your campfire dessert game with these incredible Reese’s campfire marshmallow cones! These aren’t your ordinary s’mores – they’re so much better. Imagine all the gooey, chocolatey goodness of traditional s’mores, but with the added magic of Reese’s peanut butter cups, all contained in a crispy waffle cone that makes eating around the campfire so much easier and more fun.
These Reese’s campfire marshmallow cones have become the star of every camping trip, backyard fire pit gathering, and summer party I’ve attended. What makes these Reese’s campfire marshmallow cones so special is how they take the classic s’mores concept and make it both more delicious and infinitely more practical. No more fumbling with sticky graham crackers or losing half your marshmallow to the fire – these cones hold everything perfectly!
Why Reese’s Campfire Marshmallow Cones Are Pure Genius
The beauty of Reese’s campfire marshmallow-cones lies in their simplicity and the fact that they’re almost impossible to mess up. Unlike traditional s’mores where you need perfect timing and coordination, these Reese’s campfire marshmallow cones are forgiving and fun for kids and adults alike. The waffle cone acts as both container and additional treat, while the combination of chocolate, peanut butter, and marshmallows creates that perfect sweet and salty balance we all crave.
What sets these Reese’s campfire marshmallow-cones apart from regular camping desserts is their interactive nature. Everyone gets to customize their own cone, choosing exactly how much of each ingredient they want. Kids love helping with the assembly, and adults love how mess-free they are compared to traditional s’mores. Plus, the Instagram factor is undeniable – these Reese’s campfire marshmallow cones are almost too pretty to eat!
Premium Ingredients for Perfect Reese’s Campfire-Marshmallow Cones
Essential Cone Components:
- 6-8 sugar waffle cones (the pointed ice cream cone style works best for these Reese’s campfire-marshmallow cones)
- 2 cups mini marshmallows (mini size distributes more evenly than large marshmallows)
- 12-16 Reese’s peanut butter cups, chopped (the star ingredient that makes these Reese’s campfire arshmallow cones special)
- 1 cup milk chocolate chips (for extra melty chocolate goodness)
- ½ cup graham cracker pieces, crushed (to maintain that classic s’mores flavor)
Optional Flavor Enhancers:
- ¼ cup creamy peanut butter (for extra peanut butter lovers)
- 2 tablespoons honey (drizzled inside cones for extra sweetness)
- ¼ cup toasted coconut flakes (for tropical twist)
- 2 tablespoons crushed peanuts (for extra crunch and peanut flavor)
For Wrapping and Cooking:
- Heavy-duty aluminum foil (essential for safe campfire cooking)
- Cooking spray (to prevent sticking)
Step-by-Step Instructions for Amazing Reese’s Campfire-Marshmallow Cones
Preparing Your Campfire Setup:
Step 1: Create the Perfect Cooking Environment Before you start assembling your Reese’s campfire marshmallow cones, make sure your campfire has burned down to hot coals with no active flames. You want steady, even heat rather than dancing flames that could burn your cones. If you’re using a grill, preheat it to medium heat. This controlled environment is crucial for achieving perfectly melted Reese’s campfire marshmallow -ones without burning the waffle cones.
Step 2: Prepare Your Assembly Station Set up all your ingredients in an organized workspace where everyone can easily reach them. This makes the process of creating Reese’s campfire marshmallow cones fun and interactive. Having everything ready means less time fumbling around the fire and more time enjoying the experience of making these amazing treats together.
Assembling Your Reese’s Campfire Marshmallow Cones:
Step 3: Layer Like a Pro Start each of your Reese’s campfire marshmallow-cones by adding a small handful of mini marshmallows to the bottom of each waffle cone. This creates a foundation that will help hold everything in place. Next, add 2-3 chopped Reese’s peanut butter cup pieces – this is what makes these truly special Reese’s campfire marshmallow cones!
Step 4: Build the Perfect Flavor Profile Add a layer of chocolate chips over the Reese’s pieces in your campfire marshmallow cones, followed by a sprinkle of crushed graham crackers. The key to amazing Reese’s campfire marshmallow cones is creating layers so every bite has multiple flavors and textures. Repeat this layering process until your cone is about ¾ full, leaving room for expansion as everything melts.
Step 5: Top with Marshmallow Magic Finish each of your Reese’s campfire marshmallow-cones with a generous layer of mini marshmallows on top. These will create a beautiful golden topping as they toast and help seal in all the delicious ingredients below. The marshmallows also act as a visual indicator – when they’re golden brown, your Reese’s campfire marshmallow-cones are ready!
Cooking Your Masterpieces:
Step 6: Wrap for Perfect Results Carefully wrap each of your assembled Reese’s campfire marshmallow cones in heavy-duty aluminum foil. Make sure to seal the edges well but leave a little room at the top for steam to escape. This foil wrapping is what allows your Reese’s campfire marshmallow cones to cook evenly without burning the delicate waffle cone.
Step 7: Master the Campfire Cooking Technique Place your foil-wrapped Reese’s campfire marshmallow cones on the hot coals or grill grates, positioning them away from direct flames. Cook for 3-5 minutes, rotating occasionally to ensure even heating. You’ll know your Reese’s campfire marshmallow cones are ready when you can see the marshmallows starting to brown through the foil and everything feels warm to the touch.
Step 8: The Grand Reveal Carefully remove your Reese’s campfire marshmallow cones from the heat using tongs or heat-resistant gloves. Let them cool for 1-2 minutes before unwrapping – the contents will be extremely hot! When you open the foil, you’ll be greeted with perfectly melted chocolate, gooey marshmallows, and that incredible aroma that makes these Reese’s campfire marshmallow cones so irresistible.
Pro Tips for Perfect Reese’s Campfire Marshmallow Cones
Cone Selection Matters: Choose sturdy waffle cones that can hold their shape when heated. Cheaper cones may crack or become too soft during the cooking process.
Layer Strategy: Don’t overfill your Reese’s campfire marshmallow cones – about ¾ full is perfect. Overfilling can cause ingredients to spill out during cooking.
Heat Management: Consistent, medium heat produces the best results. Too hot and the cones burn; too cool and the chocolate doesn’t melt properly.
Timing is Key: Watch for the marshmallows to turn golden brown as your indicator that the Reese’s campfire marshmallow cones are done.
Safety First: Always use tongs or heat-resistant gloves when handling hot Reese’s campfire marshmallow cones, and let them cool slightly before eating.
Creative Variations for Your Reese’s Campfire Marshmallow Cones
Once you master the basic Reese’s campfire marshmallow cones, the possibilities for customization are endless! Try using different types of Reese’s products – Reese’s Pieces, Reese’s Fast Break pieces, or even Reese’s seasonal shapes. You can also experiment with different chocolate types like dark chocolate or white chocolate chips for unique flavor profiles.
Enhance Your Campfire Experience:
Make your Reese’s campfire marshmallow cones part of an epic outdoor dining experience with these perfect companions:
- Irresistible Desserts – Discover more amazing camping desserts and sweet treats that pair perfectly with these Reese’s campfire marshmallow cones for the ultimate outdoor dessert spread
- Tasty Snacks – Find trail mix recipes and camping snacks that complement your Reese’s campfire marshmallow cones adventure
- Refreshing Beverages – Explore hot cocoa recipes and camping drinks that pair beautifully with these gooey Reese’s campfire marshmallow cones
- Perfect Sides – Check out camping side dishes and easy outdoor recipes to round out your campfire meal before enjoying these amazing Reese’s campfire marshmallow cones
Storage and Make-Ahead Tips for Reese’s Campfire Marshmallow Cones
While Reese’s campfire marshmallow cones are best enjoyed fresh from the fire, you can definitely prep components ahead of time. Pre-chop your Reese’s peanut butter cups and store them in a sealed container. Crush your graham crackers in advance and keep them in an airtight bag to maintain crispness.
For camping trips, consider pre-assembling your Reese’s campfire marshmallow cones at home and wrapping them in foil. Store them in a cooler until you’re ready to cook them over the fire. This advance preparation makes the campfire cooking process much smoother and more enjoyable for everyone.
Perfect Occasions for Reese’s Campfire Marshmallow Cones
These amazing Reese’s campfire marshmallow cones are perfect for so many occasions beyond just camping. They’re fantastic for backyard fire pit parties, making them an ideal dessert for casual entertaining. Kids absolutely love making and eating these Reese’s campfire marshmallow cones, making them perfect for family gatherings, scout trips, or summer camp activities.
The interactive nature of creating Reese’s campfire marshmallow cones makes them excellent for team-building activities or group events where you want something fun and engaging. They’re also wonderful for romantic campfire evenings – there’s something magical about sharing these sweet treats under the stars.
Why Kids Love Reese’s Campfire Marshmallow Cones
Children are absolutely fascinated by the process of making Reese’s campfire marshmallow cones. The assembly process is like a fun craft project, and kids love choosing their own ingredients and customizing their cones exactly how they want them. The waffle cone makes eating much easier for little hands compared to traditional s’mores, which tend to fall apart and get messy.
The combination of favorite flavors – chocolate, peanut butter, and marshmallows – appeals to most kids’ taste preferences. Plus, the novelty factor keeps them engaged and excited about the entire campfire cooking experience.
Health and Safety Considerations
While Reese’s campfire marshmallow cones are definitely a treat, you can make some modifications for different dietary needs. Use sugar-free chocolate chips and marshmallows for diabetic-friendly versions. For nut allergies, substitute the Reese’s cups with nut-free chocolate alternatives.
Always supervise children around the campfire when making Reese’s campfire marshmallow cones. The foil packets will be extremely hot when removed from the fire, so adult assistance is necessary for the cooking and unwrapping steps.
The Social Media Appeal of Reese’s Campfire Marshmallow Cones
Let’s be honest – these Reese’s campfire marshmallow cones are incredibly photogenic! The moment you unwrap the foil to reveal the perfectly melted, gooey contents is absolutely Instagram-worthy. The combination of colors from the golden marshmallows, melted chocolate, and colorful cone creates a visual feast that practically begs to be shared on social media.
Many people have told me that making Reese’s campfire marshmallow cones has become a tradition at their camping trips specifically because everyone wants to capture and share photos of the process and final result. It’s become a way to document and share outdoor adventures with friends and family.
Why Reese’s Campfire Marshmallow Cones Beat Traditional S’mores
While we all love classic s’mores, these Reese’s campfire marshmallow cones solve many of the traditional problems associated with campfire s’mores. No more broken graham crackers, no more lost marshmallows in the fire, and no more sticky fingers trying to assemble everything quickly before it all melts and falls apart.
The cone design makes eating much cleaner and more enjoyable. Everything stays contained, and you can take your time savoring each bite. Plus, the addition of Reese’s peanut butter cups elevates the flavor profile far beyond what traditional s’mores can offer.
These Reese’s campfire marshmallow cones represent the evolution of campfire cooking – taking a beloved classic and making it better, easier, and more delicious. Once you try them, you’ll wonder why anyone still struggles with traditional s’mores when these amazing cones exist.
Whether you’re a seasoned camper or someone who just enjoys the occasional backyard fire pit, these Reese’s campfire marshmallow cones will become your new favorite campfire tradition. They combine the best of comfort food nostalgia with practical innovation, creating an experience that’s as fun to make as it is to eat.
Looking for more amazing outdoor cooking ideas? Explore our Dinner Delights and Breakfast Favorites collections for complete campfire meal planning that pairs perfectly with these incredible Reese’s campfire marshmallow cones.

