Prep Time: 20 minutes | Bake Time: 30-35 minutes | Total Time: 55 minutes
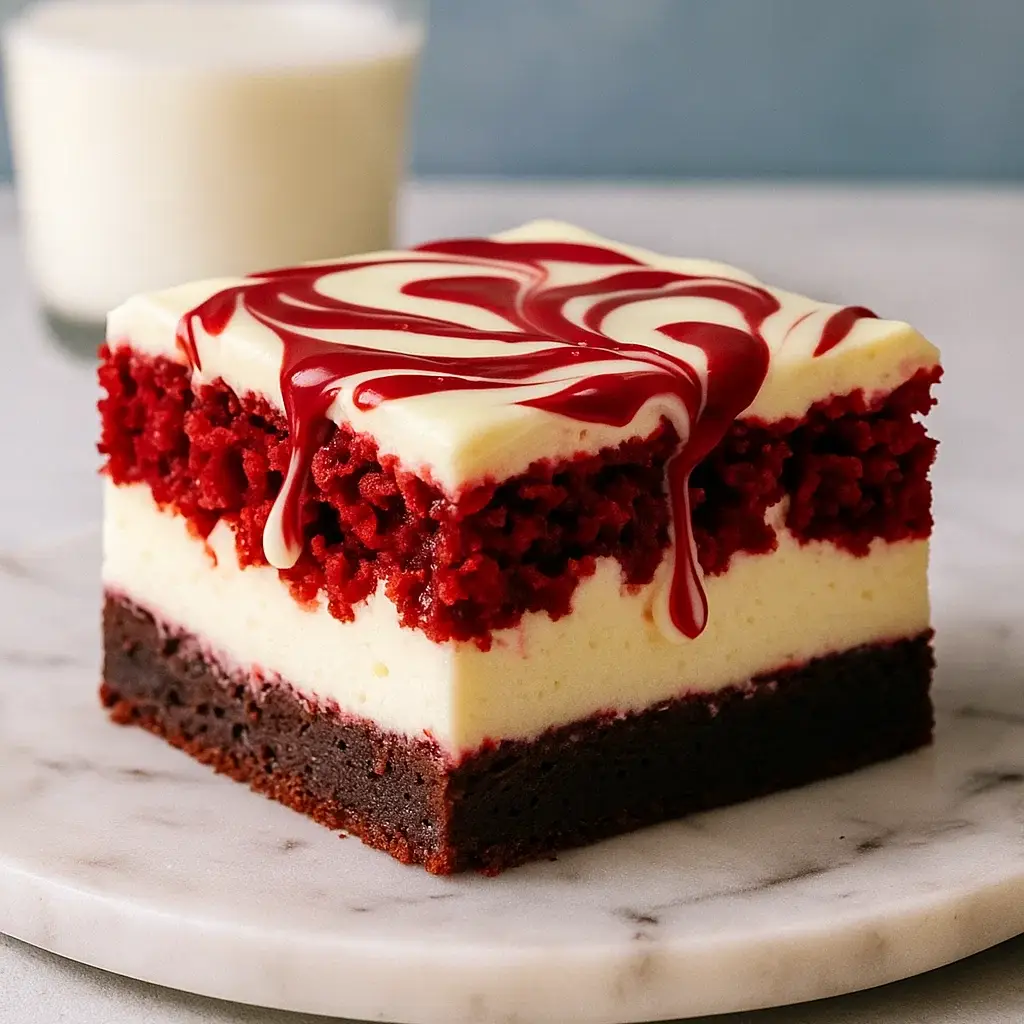
There’s something absolutely magical about the moment you cut into these Red Velvet Cheesecake Brownies and see those gorgeous ruby-red swirls dancing through creamy white cheesecake. I’ll never forget the first time I made these for my sister’s birthday party – the entire room went silent when I brought them out, and then erupted in pure joy after that first bite.
These Red Velvet Cheesecake Brownies represent the perfect marriage of two beloved desserts. The fudgy richness of red velvet meets the tangy smoothness of New York-style cheesecake, creating something that’s honestly better than either dessert could ever be on its own. And the best part? They look like they came from a high-end bakery, but they’re surprisingly achievable in your home kitchen.
Why These Red Velvet Cheesecake Brownies Will Steal the Show
What makes these Red Velvet Cheesecake Brownies so irresistible isn’t just their stunning appearance – though that marbled pattern never fails to impress. It’s the incredible texture contrast that happens in your mouth. The dense, fudgy brownie layer provides that satisfying chocolate base, while the cheesecake swirl adds a cool, creamy element that balances everything perfectly.
I’ve served these Red Velvet Cheesecake Brownies at everything from casual family dinners to elegant holiday gatherings, and they never fail to be the star of the dessert table. Kids love the vibrant color and sweet flavor, while adults appreciate the sophisticated combination of textures and that subtle tang from the cream cheese.
The secret to these Red Velvet Cheesecake Brownies lies in getting the temperatures just right and mastering the swirling technique. Too much mixing and you’ll lose those beautiful distinct layers; too little and you won’t get that gorgeous marbled effect that makes these brownies so photogenic.
Premium Ingredients for Perfect Red Velvet Cheesecake Brownies
For the Red Velvet Brownie Base:
- 1/2 cup unsalted European-style butter, melted – I prefer European butter for its higher fat content, which creates an incredibly rich, fudgy texture in these Red Velvet Cheesecake Brownies
- 1 cup granulated sugar – This creates the perfect sweetness balance and helps achieve that characteristic chewy-fudgy texture
- 2 large farm-fresh eggs, room temperature – Room temperature eggs incorporate more easily and create a smoother batter
- 1 teaspoon pure vanilla extract – Never use artificial vanilla in Red Velvet Cheesecake Brownies; the real thing makes a noticeable difference
- 1 tablespoon gel red food coloring – Gel coloring provides more vibrant color without thinning the batter. For natural alternatives, check out natural food coloring options
- 1 tablespoon high-quality cocoa powder – Dutch-processed cocoa gives the best flavor depth
- 3/4 cup all-purpose flour, sifted – Sifting prevents lumps and creates a tender crumb
- 1/4 teaspoon fine sea salt – This enhances all the other flavors in your Red Velvet Cheesecake Brownies
For the Luxurious Cheesecake Layer:
- 8 ounces full-fat cream cheese, completely softened – This is crucial! Cold cream cheese will create lumps no matter how hard you beat it. Learn more about proper cream cheese preparation techniques
- 1/4 cup granulated sugar – Just enough sweetness to complement without overwhelming
- 1 large egg, room temperature – This binds everything together and creates that perfect creamy texture
- 1/2 teaspoon pure vanilla extract – Enhances the overall flavor profile of your Red Velvet Cheesecake Brownies
Chef’s Secret: I always let my cream cheese sit out for at least 2 hours before making these Red Velvet Cheesecake Brownies. Properly softened cream cheese is the difference between silky smooth and lumpy disappointment.
Masterful Instructions for Red Velvet Cheesecake Brownies Perfection
Step 1: Create the Perfect Baking Environment
Preheat your oven to 350°F (175°C) and position the rack in the center. Line an 8×8-inch baking pan with parchment paper, leaving about 2 inches of overhang on two sides – this creates easy “handles” for lifting out your finished Red Velvet Cheesecake Brownies. Lightly grease the parchment to prevent any sticking.
Step 2: Craft the Red Velvet Brownie Foundation
In a large mixing bowl, whisk your melted butter with the granulated sugar until the mixture is completely smooth and slightly glossy – this takes about 2 minutes of vigorous whisking. Add your eggs one at a time, beating well after each addition until fully incorporated. The mixture should look creamy and unified.
Stir in the vanilla extract and red food coloring, starting with 3/4 tablespoon and adding more until you achieve that signature deep red color. The batter should remind you of liquid velvet – rich, smooth, and gorgeously colored.
Step 3: Perfect the Dry Ingredient Integration
In a separate bowl, whisk together your sifted flour, cocoa powder, and salt. This ensures even distribution and prevents pockets of flour in your finished Red Velvet Cheesecake Brownies.
Gently fold the dry ingredients into your wet mixture using a rubber spatula, making broad, gentle strokes. Stop mixing the moment you no longer see streaks of flour – overmixing will create tough, dense brownies instead of the fudgy texture we’re after.
Step 4: Create the Silky Cheesecake Layer
In a completely clean bowl (any residual fat will prevent proper mixing), beat your softened cream cheese with an electric mixer on medium speed until it’s completely smooth and fluffy – about 2-3 minutes. Scrape down the sides frequently.
Gradually add the sugar, beating until the mixture is light and airy. Add the egg and vanilla, beating just until incorporated. The mixture should be smooth as silk with no lumps whatsoever.
Step 5: Master the Layering Technique
Pour about three-quarters of your red velvet batter into the prepared pan, spreading it evenly with an offset spatula. Reserve the remaining quarter for the marbling process – this is key to achieving those stunning swirls in your Red Velvet Cheesecake Brownies.
Gently spoon the cheesecake mixture over the brownie layer, starting from the center and working outward. Use the back of a spoon to spread it evenly, being careful not to disturb the brownie layer beneath.
Step 6: Create the Signature Swirl Pattern
Drop small spoonfuls of the reserved red velvet batter randomly across the surface of the cheesecake layer. Using a sharp knife or wooden skewer, create your swirl pattern by drawing the tip through both layers in figure-eight motions, spirals, or gentle S-curves.
The key to beautiful Red Velvet Cheesecake Brownies is restraint – don’t over-swirl! You want distinct ribbons of red and white, not a muddy mixture.
Step 7: Achieve Perfect Doneness
Bake your Red Velvet Cheesecake Brownies for 30-35 minutes, rotating the pan halfway through for even cooking. They’re done when the center feels just set (not jiggly) and a toothpick inserted into the brownie portion comes out with a few moist crumbs – never completely clean.
The top should have a slight sheen but shouldn’t look wet. Remember, these Red Velvet Cheesecake Brownies will continue cooking slightly from residual heat even after removal from the oven.
Internal Links for More Amazing Treats
While you’re indulging in dessert perfection, explore more incredible recipes on our site:
- Looking for the perfect ending to a meal? Browse our complete Irresistible Desserts collection for more show-stopping sweets
- Planning a party spread? Check out our Tasty Snacks for perfect companions to these Red Velvet Cheesecake Brownies
- Want something to cleanse the palate? Our Refreshing Beverages pair beautifully with rich desserts
- Need breakfast inspiration? Transform your morning with our Breakfast Favorites collection
- Planning a complete dinner menu? Our Dinner Delights offer perfect meal endings
- Want lighter options to balance the richness? Try our Fresh Vibrant Salads as palate cleansers
Professional Tips for Red Velvet Cheesecake Brownies Success
Temperature is Everything: Both your eggs and cream cheese must be at room temperature. Cold ingredients don’t blend properly and can create a lumpy texture that will ruin your Red Velvet Cheesecake Brownies. Plan ahead and take them out 2-3 hours before baking.
The Toothpick Test: For Red Velvet Cheesecake Brownies, you want moist crumbs, not a clean toothpick. The residual heat will finish cooking them perfectly without overdrying. According to baking science experts, this technique ensures the perfect fudgy texture.
Cooling Patience: These Red Velvet Cheesecake Brownies need to cool completely before cutting, ideally with 30 minutes in the refrigerator. This sets the cheesecake layer and makes clean cutting possible.
Storage Wisdom: Thanks to the cream cheese, these Red Velvet Cheesecake Brownies actually improve after a day in the refrigerator. The flavors meld beautifully, and the texture becomes even more luxurious.
Nutritional Benefits and Dietary Considerations
While Red Velvet Cheesecake Brownies are definitely an indulgent treat, they do provide some nutritional value. The cream cheese contributes protein and calcium, while the eggs add high-quality protein and essential amino acids. For those with dietary restrictions, you can easily adapt this recipe using gluten-free flour blends or natural food colorings.
Creative Variations for Your Red Velvet Cheesecake Brownies
White Chocolate Chip Addition: Fold 1/2 cup of white chocolate chips into the brownie batter before layering for extra richness and texture contrast.
Raspberry Swirl Version: Add 2 tablespoons of raspberry jam to the cheesecake layer for a fruity twist that complements the chocolate beautifully.
Mini Red Velvet Cheesecake Brownies: Use a mini muffin tin for individual portions – perfect for parties and portion control. Adjust baking time to 18-22 minutes.
Storage and Serving Suggestions
Store your Red Velvet Cheesecake Brownies covered in the refrigerator for up to one week. They actually taste better after 24 hours when the flavors have had time to meld. For longer storage, these freeze beautifully for up to three months when wrapped individually in plastic wrap.
Serve these Red Velvet Cheesecake Brownies at room temperature for the best texture, or slightly chilled if you prefer a firmer consistency. A light dusting of powdered sugar or a drizzle of chocolate ganache can elevate them even further for special occasions.
Final Thoughts on Your New Signature Dessert
These Red Velvet Cheesecake Brownies represent everything I love about baking – they’re visually stunning, incredibly delicious, and surprisingly achievable for home bakers. The combination of techniques you’ll master making this recipe will serve you well in countless other baking adventures.
Whether you’re making these Red Velvet Cheesecake Brownies for a special celebration or just because you deserve something wonderful, remember that the joy is in both the making and the sharing. There’s something deeply satisfying about creating something this beautiful with your own hands.
So preheat that oven, gather your ingredients, and get ready to create some serious dessert magic. Your kitchen is about to smell absolutely incredible, and your family and friends are in for a real treat!
Have you tried these Red Velvet Cheesecake Brownies? I’d love to hear about your swirling techniques and any creative variations you’ve discovered. Share your photos and tips in the comments below!


