Prep Time: 15 minutes | Cook Time: 25 minutes | Total Time: 40 minutes
What Makes This Cheesy Cajun Garlic Rotini Special
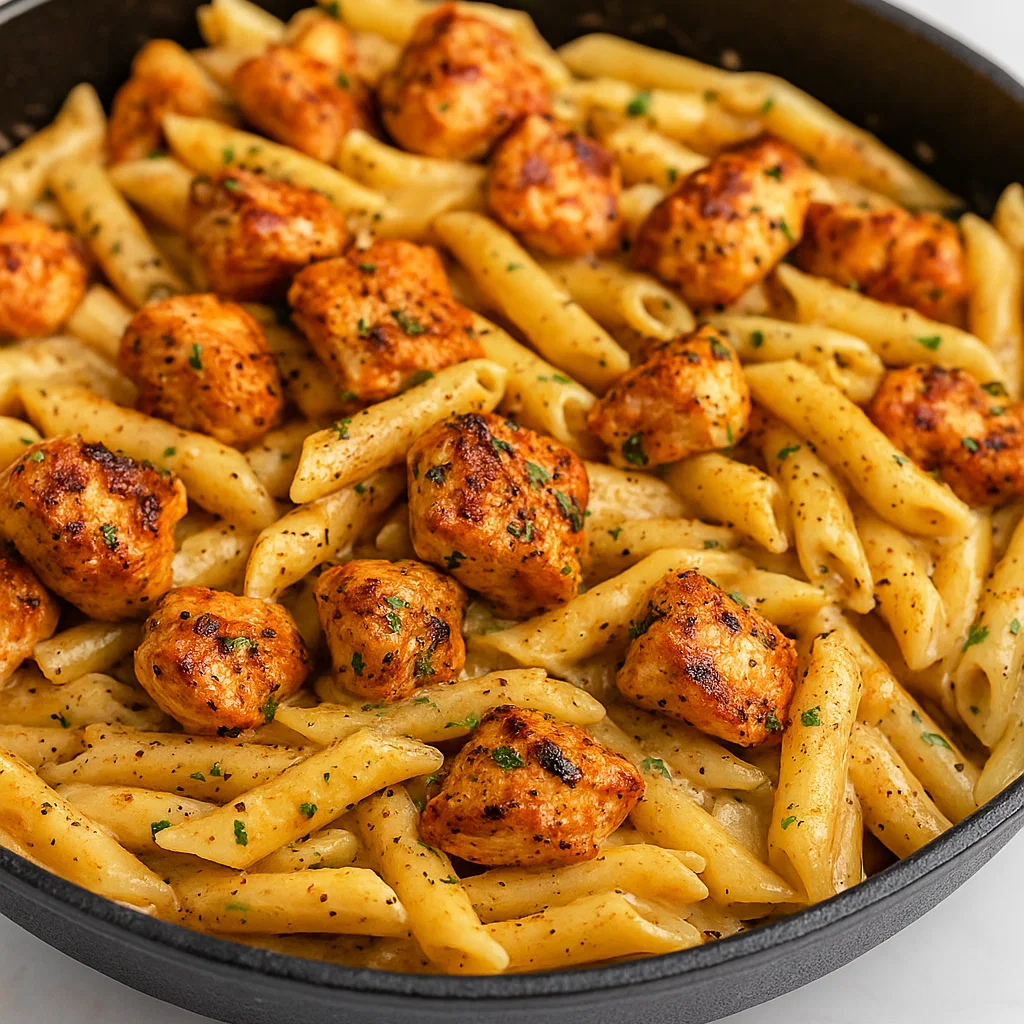
There’s something absolutely irresistible about the way cajun spices dance with creamy cheese and aromatic garlic. This cheesy cajun garlic rotini combines the smoky heat of authentic cajun seasoning with the rich, velvety smoothness of a three-cheese sauce. The rotini pasta’s twisted shape catches every drop of that gorgeous sauce, ensuring each forkful is loaded with flavor.
What truly sets this recipe apart is how it transforms simple pantry ingredients into restaurant-quality comfort food. The garlic butter foundation creates an aromatic base, while the cajun-seasoned chicken adds protein and that signature Louisiana kick. Meanwhile, the combination of cheddar, mozzarella, and parmesan creates a cheese sauce that’s both indulgent and perfectly balanced.
The Perfect Ingredients for Cheesy Cajun Garlic Rotini
For the Cajun Chicken:
- 1 pound boneless, skinless chicken breasts, cut into bite-sized pieces
- 2 tablespoons cajun seasoning (homemade or store-bought)
- 1 teaspoon garlic powder
- 1 teaspoon onion powder
- 1/2 teaspoon smoked paprika
- Salt and black pepper to taste
- 2 tablespoons olive oil
For the Pasta and Sauce:
- 12 ounces rotini pasta
- 4 tablespoons butter
- 4 cloves garlic, minced
- 1 cup heavy cream
- 1/2 cup chicken broth
- 1 cup sharp cheddar cheese, freshly shredded
- 3/4 cup mozzarella cheese, freshly shredded
- 1/2 cup freshly grated parmesan cheese
- 1/4 teaspoon red pepper flakes (optional)
- Fresh green onions for garnish
- Additional cajun seasoning for final touch
The secret to exceptional cheesy cajun garlic rotini lies in using freshly shredded cheese rather than pre-packaged varieties. Fresh cheese melts more smoothly and creates that silky, restaurant-quality sauce texture we’re after.
Step-by-Step Instructions for Perfect Cheesy Cajun Garlic Rotini
Preparing Your Mise en Place
Before you start cooking, gather all your ingredients and prep everything. Cube your chicken into uniform pieces, mince the garlic, and have all your cheeses ready to go. This cheesy cajun garlic rotini comes together quickly once you start, so preparation is key to success.
Step 1: Cook the Rotini to Perfection
Bring a large pot of generously salted water to a rolling boil. The water should taste like mild seawater – this seasons the pasta from within. Add the rotini and cook according to package directions until al dente, usually about 8-10 minutes. Remember, the pasta will continue cooking slightly in the sauce, so don’t overdo it. Reserve one cup of the starchy pasta water before draining – this liquid gold will help perfect your sauce consistency later.
Step 2: Season and Sear the Cajun Chicken
Cheesy Cajun Garlic Rotini
While the pasta cooks, season your chicken pieces generously with cajun seasoning, garlic powder, onion powder, smoked paprika, salt, and pepper. Make sure every piece is well-coated – this seasoning creates the flavor foundation of our cheesy cajun garlic rotini.
Heat olive oil in a large, heavy-bottomed skillet over medium-high heat. When the oil shimmers, add the seasoned chicken in a single layer. Don’t overcrowd the pan; work in batches if necessary. Let the chicken sear undisturbed for 3-4 minutes, developing that beautiful golden crust, then flip and cook another 3-4 minutes until cooked through. The internal temperature should reach 165°F. Transfer the chicken to a plate and set aside – those beautiful browned bits left in the pan are flavor gold for our sauce.
Cheesy Cajun Garlic Rotini
Step 3: Build the Aromatic Garlic Base
Reduce the heat to medium and add butter to the same skillet, scraping up any delicious browned bits from the chicken. When the butter melts and becomes fragrant, add the minced garlic. Cook for just 30-45 seconds until aromatic – be careful not to burn it, as burnt garlic will make your cheesy cajun garlic rotini bitter.
Step 4: Create the Creamy Foundation
Pour in the heavy cream and chicken broth, whisking gently to combine. Bring this mixture to a gentle simmer, then reduce heat to low. This step is crucial – too high heat will cause the cream to curdle, ruining the smooth texture we want in our cheesy cajun garlic rotini.
Step 5: Melt in the Cheese Magic
Now comes the most important part of creating exceptional cheesy cajun garlic rotini – adding the cheese properly. Remove the skillet from direct heat and add the cheeses gradually, starting with the cheddar, then mozzarella, and finally the parmesan. Whisk constantly as each addition melts completely before adding the next. This gradual process prevents the cheese from seizing and ensures a silky smooth sauce.
If your sauce seems too thick, add pasta water a tablespoon at a time until you achieve the perfect consistency. The sauce should coat the back of a spoon but still flow easily.
: Bring Everything Together
Return the skillet to low heat and add the cooked rotini, tossing
Related Recipes and Internal Links
Want to explore more delicious options for your next gathering? Check out our collection of perfect sides that pair beautifully with this grilled shrimp avocado salsa. You might also enjoy our flavored dips and marinades for more party-ready recipes.
For beverages to serve alongside this dish, browse our refreshing beverages section. If you’re planning a complete meal, our fresh vibrant salads and hearty main dishes offer plenty of inspiration.
This grilled shrimp avocado salsa also works wonderfully as part of a tasty snacks spread, or transform it into a more substantial dinner delight by serving over rice or pasta.
Nutritional Benefits
Beyond its incredible taste, this grilled shrimp avocado salsa packs impressive nutritional value. Shrimp provides lean protein and essential omega-3 fatty acids, while avocados contribute heart-healthy monounsaturated fats and fiber. The tomatoes and lime juice add vitamin C, and the fresh herbs provide antioxidants.
Variations and Customizations
Tropical Twist: Add diced mango or pineapple for a sweet, tropical version of this grilled shrimp avocado salsa.
Spicy Version: Include additional jalapeños or a pinch of red pepper flakes for extra heat.
Herb Variations: Try substituting or adding fresh mint, basil, or dill for different flavor profiles.
Grain Bowl Style: Serve this grilled shrimp avocado salsa over quinoa, brown rice, or farro for a complete meal.
Conclusion
This grilled shrimp avocado salsa represents everything I love about summer cooking – fresh ingredients, bold flavors, and simple preparation that delivers restaurant-quality results. Whether you’re hosting a backyard barbecue, planning a beach picnic, or simply want to bring some sunshine to your dinner table, this recipe delivers every time.
The combination of smoky grilled shrimp and creamy avocado salsa creates a dish that’s both sophisticated enough for entertaining and easy enough for weeknight dinners. Once you try this grilled shrimp avocado salsa, it’s sure to become a regular in your recipe rotation.
Looking for more delicious recipes like this grilled shrimp avocado salsa? Check out our breakfast favorites and irresistible desserts to complete your meal planning. Visit SolushRecipes.com for hundreds more tested recipes your family will love.


