Prep Time: 30 minutes Cook Time: 8 minutes Total Time: 38 minutes (plus 6 hours freezing time) Serves: 12
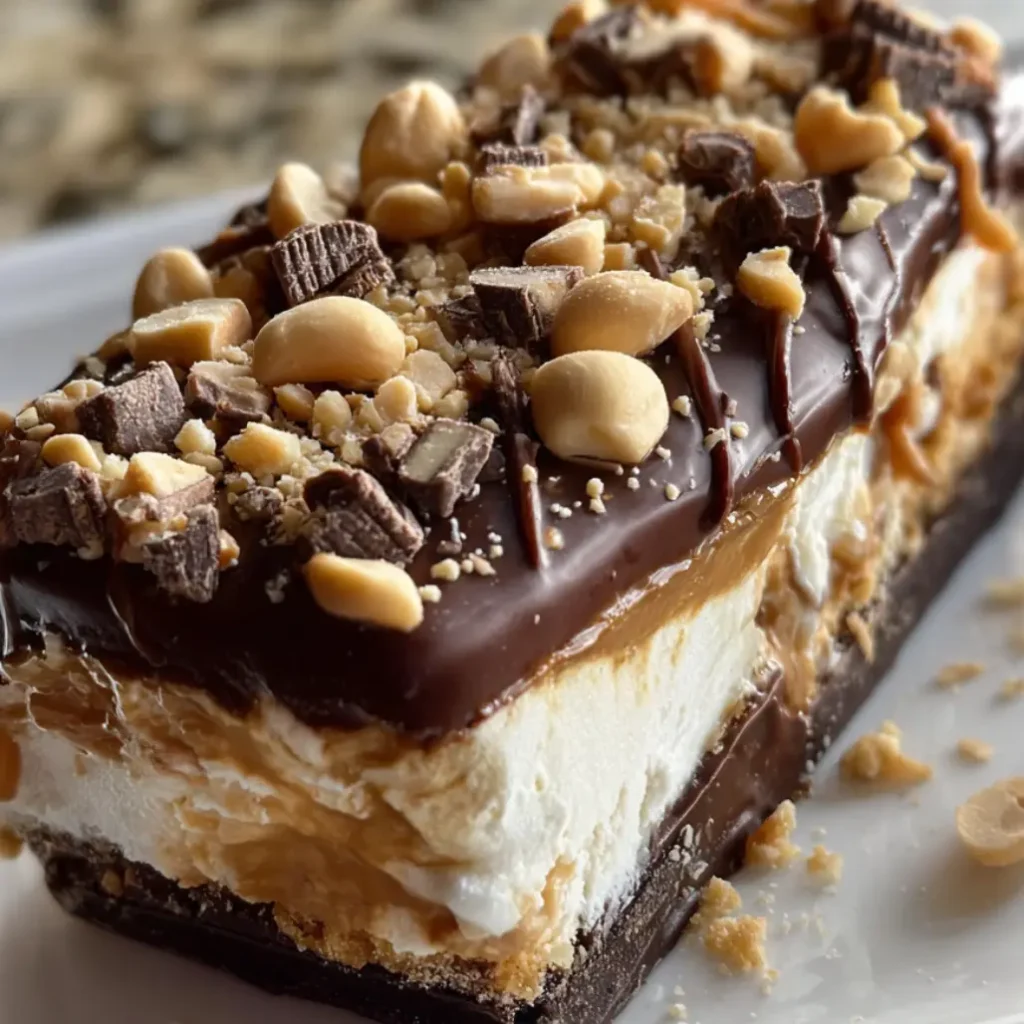
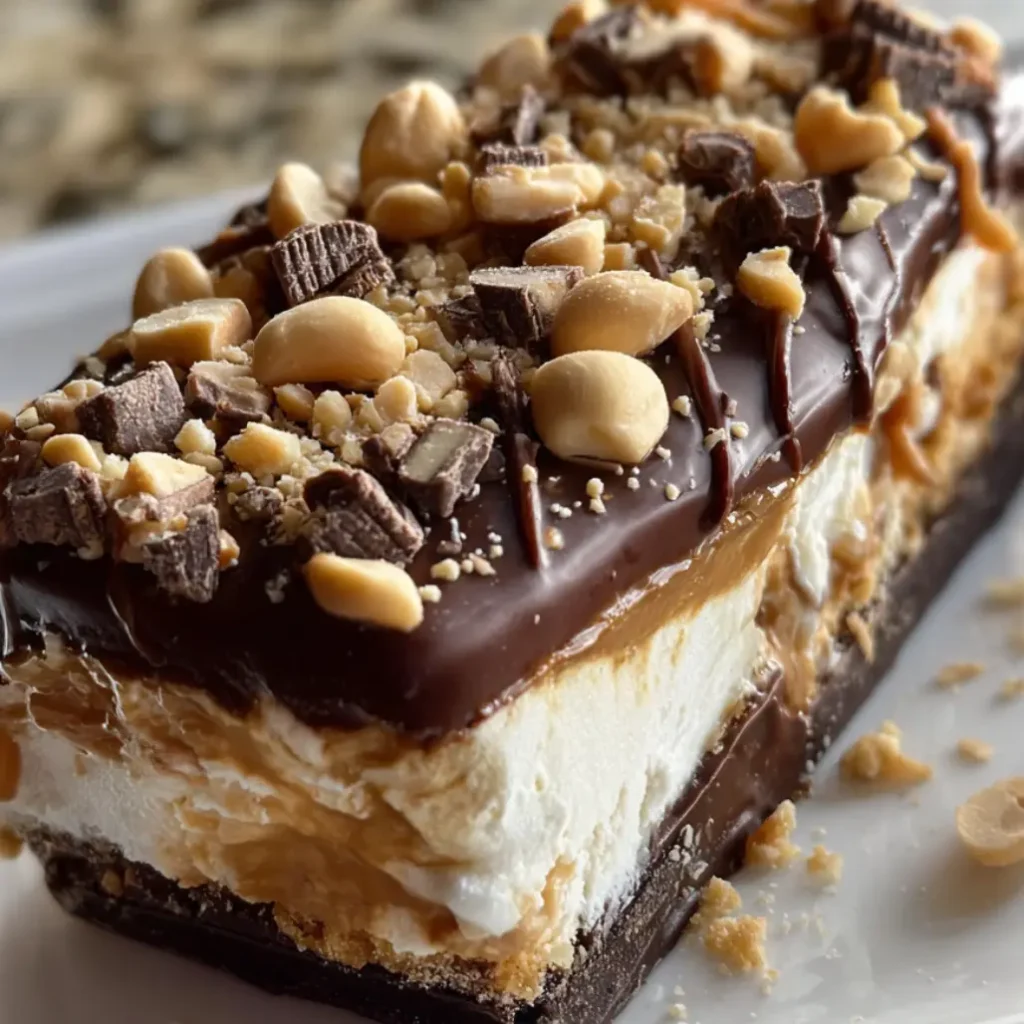
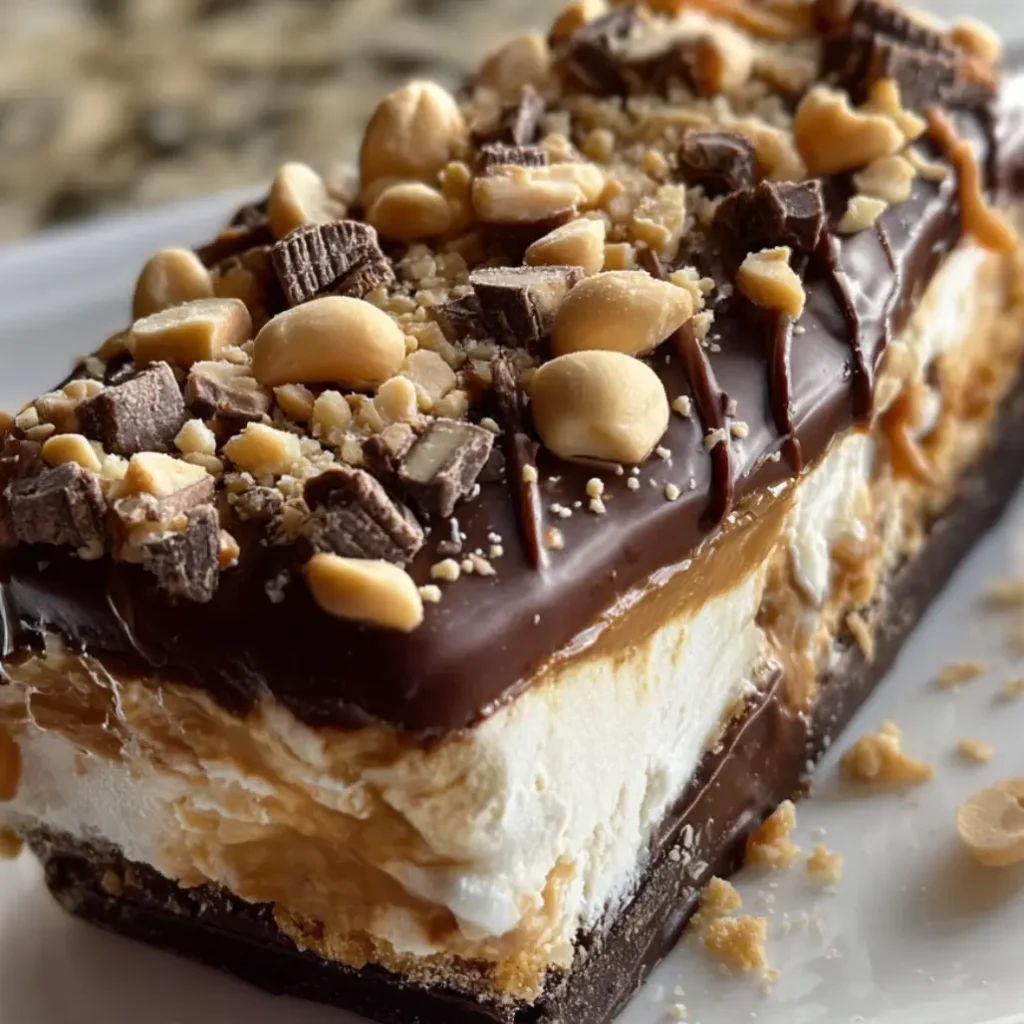
Nothing captures the essence of summer nostalgia quite like the beloved Buster Bar Ice Cream, a masterful recreation of Dairy Queen’s iconic frozen treat that transforms childhood memories into an extraordinary homemade dessert experience. This indulgent layered creation combines the rich complexity of chocolate Oreo cookie crust with luxurious vanilla ice cream, decadent homemade fudge sauce, and the perfect crunch of salted peanuts, all harmoniously united in a dessert that delivers both comfort and sophistication because every bite represents the perfect balance of textures and flavors that made the original so irresistible.
Why This Buster Bar Ice Cream Stands Above the Rest
The magic of this Buster Bar Ice Cream lies in its remarkable ability to capture all the nostalgic flavors of the original Dairy Queen treat while elevating them through careful homemade preparation and premium ingredients. Unlike store-bought alternatives, this version allows complete control over every component, ensuring that each layer contributes meaningfully to the overall taste experience because quality ingredients and proper technique create a dessert that surpasses expectations. The homemade fudge sauce remains perfectly soft even when frozen, creating that signature contrast against the firm ice cream that makes each bite a delightful surprise, while the careful layering process ensures that every portion contains the ideal ratio of chocolate, vanilla, nuts, and creamy textures.
What truly sets this recipe apart is its versatility and make-ahead convenience, making it the perfect choice for entertaining because the entire dessert can be prepared days in advance and stored in the freezer until needed. The generous 9×13 pan size transforms the traditional stick format into a crowd-pleasing dessert that serves twelve people generously, eliminating the need for individual preparation while maintaining all the beloved characteristics that make Buster Bars so special. The combination of familiar flavors with restaurant-quality presentation makes this dessert equally suitable for casual family gatherings and elegant dinner parties.
Essential Ingredients for Perfect Buster Bar Ice Cream
For the Chocolate Cookie Crust:
- 36 chocolate sandwich cookies (Oreos), finely crushed
- 1/2 cup unsalted butter, melted
For the Ice Cream Layers:
- 1/2 gallon premium vanilla ice cream, softened
- 1 cup salted roasted peanuts, divided
For the Homemade Fudge Sauce:
- 1 cup semi-sweet chocolate chips
- 1/2 cup evaporated milk
- 1/4 cup unsalted butter
- 1 cup powdered sugar
- 1 teaspoon pure vanilla extract
For the Final Touch:
- 1/4 cup chocolate magic shell coating
- Additional crushed cookies for garnish
The quality of ingredients directly impacts the final result, so choosing premium vanilla ice cream with rich, creamy texture creates the foundation for exceptional flavor because inferior ice cream often contains excessive air and artificial flavors that compromise the overall taste. Similarly, using real chocolate chips rather than chocolate-flavored morsels ensures that the fudge sauce develops the proper consistency and deep chocolate flavor that characterizes authentic Buster Bar desserts.
The Art of Creating Perfect Buster Bar Ice Cream
Creating exceptional Buster Bar Ice Cream requires understanding the delicate balance between preparation timing and temperature control because ice cream desserts demand precise execution to achieve the proper texture and layering. The process begins with proper mise en place, ensuring all ingredients are measured and prepared before assembly begins, while the ice cream should be removed from the freezer approximately 15-20 minutes before use to achieve the ideal softening consistency that spreads easily without becoming soupy.
The key to professional results lies in working efficiently through each layer while maintaining proper temperature control throughout the assembly process. This means having all components ready simultaneously and working quickly to prevent melting, while understanding that each layer must be properly set before adding the next to maintain distinct boundaries and prevent mixing. The homemade fudge sauce, in particular, requires cooling to room temperature before application to prevent melting the ice cream layer beneath it.
Temperature management extends beyond just keeping things cold because the contrast between the various textures creates the signature Buster Bar experience. The cookie crust should remain crisp, the ice cream should be firm yet creamy, the fudge should stay pliable, and the peanuts should maintain their crunch, all working together to create the complex mouthfeel that makes this dessert so memorable.
Step-by-Step Instructions for Buster Bar Ice Cream Mastery
Step 1: Prepare the Cookie Crust Foundation Remove the vanilla ice cream from freezer to begin softening while preparing the crust. Place the chocolate sandwich cookies in a food processor and pulse until they form fine, uniform crumbs with no large pieces remaining. Add the melted butter and pulse until the mixture resembles wet sand and holds together when pressed. Transfer the mixture to a greased 9×13-inch baking dish and press firmly into an even layer using the bottom of a measuring cup or flat-bottomed glass.
Professional Tip: For the most professional-looking crust, use a piece of parchment paper between the measuring cup and crumbs to prevent sticking while ensuring even compression.
Key Points: The crust should be compact enough to support the ice cream layers but not so compressed that it becomes difficult to cut through when serving.
Step 2: Create the First Ice Cream Layer Remove the cookie crust from the refrigerator and spread half of the softened vanilla ice cream evenly over the surface using an offset spatula or large spoon. Work quickly but carefully to create a smooth, level layer that covers the entire crust surface because uneven layers will affect the final presentation and serving portions.
Professional Tip: Dip your spatula in warm water and wipe clean between applications to prevent ice cream from sticking and creating drag marks.
Key Points: The ice cream should be soft enough to spread easily but not so melted that it seeps into the cookie crust or loses its shape.
Step 3: Prepare the Signature Fudge Sauce In a medium saucepan over medium heat, combine the chocolate chips, evaporated milk, butter, and powdered sugar. Stir constantly to prevent scorching and bring the mixture to a gentle boil, then continue cooking for exactly 8 minutes while stirring continuously. Remove from heat and stir in vanilla extract, then allow the sauce to cool completely to room temperature before proceeding.
Professional Tip: The fudge sauce is ready when it coats the back of a spoon and holds its shape briefly when drizzled, indicating the proper consistency for layering.
Key Points: Cooling the fudge sauce completely prevents it from melting the ice cream layer and ensures it will set properly when frozen.
Step 4: Add the Fudge and Peanut Layer Pour the cooled fudge sauce over the first ice cream layer and spread gently to create an even coating that reaches all edges. Sprinkle half of the salted peanuts evenly over the fudge layer, pressing them gently into the surface to ensure they adhere properly during freezing.
Professional Tip: Reserve the prettiest, most uniform peanuts for the final top layer to create the most attractive presentation.
Key Points: Even distribution of peanuts ensures every serving contains the proper flavor balance and textural contrast.
Step 5: Complete the Second Ice Cream Layer Carefully spread the remaining softened ice cream over the fudge and peanut layer, taking care not to disturb the layers beneath while creating another smooth, even surface. Use gentle pressing motions rather than spreading to avoid pulling up the fudge layer.
Professional Tip: If the ice cream becomes too soft during assembly, place the entire pan in the freezer for 15 minutes before continuing.
Key Points: This layer should completely seal in the fudge and peanuts while providing a clean surface for the final toppings.
Step 6: Apply Final Toppings and Freeze Sprinkle the remaining peanuts evenly over the top ice cream layer and drizzle with magic shell coating in decorative patterns. Cover the entire pan tightly with plastic wrap and freeze for at least 6 hours or overnight until completely firm throughout.
Professional Tip: For easy serving, dip your knife in warm water between cuts to prevent cracking and ensure clean slices.
Key Points: Complete freezing is essential for proper slicing and presentation, while the magic shell coating provides the characteristic crunch of the original Buster Bar.
Professional Tips for Buster Bar Ice Cream Excellence
Achieving restaurant-quality results requires attention to several professional techniques that elevate homemade desserts beyond amateur attempts. First, always use premium ingredients because the simplicity of this dessert means that every component contributes significantly to the final flavor profile. Choose vanilla ice cream with real vanilla and minimal artificial additives, select chocolate chips rather than compound chocolate for the fudge sauce, and opt for high-quality salted peanuts with consistent size and freshness.
Temperature control represents the most critical aspect of successful ice cream dessert preparation because working with frozen components requires precise timing and technique. Remove ice cream from the freezer only when ready to use each layer, and return the assembled dessert to the freezer immediately after each step to maintain proper consistency. If at any point the ice cream becomes too soft, pause the assembly process and refreeze until workable.
Presentation details make the difference between homemade and professional appearance because visual appeal significantly impacts the overall dining experience. When cutting for service, always use a sharp knife dipped in warm water and wiped clean between cuts to prevent dragging or tearing. Allow the dessert to sit at room temperature for 3-5 minutes before cutting to prevent cracking while maintaining the firm texture that characterizes properly frozen ice cream desserts.
Creative Variations to Personalize Your Buster Bar Ice Cream
The versatility of this Buster Bar Ice Cream base allows for countless creative adaptations that cater to different tastes and dietary preferences while maintaining the essential character that makes the dessert so beloved. For chocolate enthusiasts, substitute chocolate ice cream for vanilla in one or both layers, or add chocolate chips to the fudge sauce for extra richness and texture. Coffee lovers can incorporate espresso powder into the fudge sauce or use coffee ice cream to create a sophisticated mocha variation that appeals to adult palates.
Seasonal variations bring fresh excitement to this classic dessert throughout the year because adapting familiar recipes to incorporate seasonal flavors keeps them interesting and relevant. During autumn months, consider adding cinnamon to the cookie crust and using butter pecan ice cream, while winter holidays might inspire peppermint ice cream with crushed candy canes replacing the peanuts. Spring and summer variations could include strawberry ice cream with fresh berry compote or coconut ice cream with toasted coconut flakes.
For those with dietary restrictions, numerous substitutions maintain the essential character while accommodating specific needs. Dairy-free versions work beautifully using premium coconut or cashew-based ice creams, while gluten-free cookie crusts can be created using certified gluten-free sandwich cookies. Nut-free versions substitute mini chocolate chips, toffee bits, or crispy rice cereal for peanuts, providing similar textural contrast without allergen concerns.
Perfect Pairing Ideas for Complete Dessert Experiences
The rich, indulgent nature of Buster Bar Ice Cream makes it an ideal centerpiece for dessert courses that benefit from complementary beverages and accompaniments that enhance rather than compete with its complex flavors. Coffee-based beverages create natural partnerships because the slight bitterness of espresso or rich coffee provides perfect contrast to the sweet, creamy dessert elements. Consider serving alongside freshly brewed coffee, espresso, or even iced coffee drinks that echo the dessert’s cooling properties.
For special occasions, this dessert pairs beautifully with premium spirits and liqueurs that complement chocolate and vanilla flavors. Bourbon or whiskey adds sophisticated warmth that balances the cold dessert, while coffee liqueurs like Kahlua or Frangelico create harmonious flavor bridges. Wine pairings work particularly well with dessert wines, port, or even champagne for celebratory occasions because the effervescence cleanses the palate between rich bites.
Consider incorporating elements from other beloved dessert categories to create themed dessert spreads that showcase complementary flavors and textures. Pair with lighter options from refreshing beverages to balance the richness, or explore additional sweet treats from dessert recipes to create variety within your dessert presentation.
Discover More Culinary Adventures
Expanding your dessert repertoire with complementary recipes creates opportunities for complete meal planning and entertaining success because versatile cooks understand how different dishes work together to create memorable dining experiences. This Buster Bar Ice Cream represents just one example of how classic American desserts can be elevated through careful technique and quality ingredients, inspiring exploration of other beloved treats that benefit from homemade preparation.
The principles learned through mastering this ice cream dessert apply broadly to other frozen treats and layered desserts because understanding temperature control, ingredient quality, and presentation techniques transfers to numerous culinary applications. These skills prove invaluable when exploring other categories like breakfast favorites that might incorporate similar techniques or snacks appetizers that utilize comparable layering methods.
Building confidence with complex desserts like this opens doors to more adventurous cooking projects because success in challenging recipes provides the foundation for tackling even more sophisticated culinary endeavors. The satisfaction of creating restaurant-quality desserts at home motivates continued exploration of advanced techniques and flavor combinations that expand both skills and repertoire.
Proper Storage Guidelines for Maximum Quality
Maintaining the quality and safety of homemade Buster Bar Ice Cream requires understanding proper storage techniques that preserve both flavor and texture while preventing freezer burn and contamination. Always cover the completed dessert tightly with plastic wrap, ensuring the covering makes direct contact with the surface to prevent air exposure that leads to ice crystal formation and flavor degradation. For extended storage beyond one week, add an additional layer of aluminum foil over the plastic wrap to provide extra protection against freezer odors and temperature fluctuations.
Proper freezer temperature control maintains the ideal texture that characterizes professional-quality frozen desserts because temperature variations cause ice crystals to form and grow, creating grainy textures that compromise the smooth, creamy mouthfeel. Maintain freezer temperature at 0°F (-18°C) or below, and avoid placing the dessert near the freezer door where temperature fluctuations are most common due to frequent opening and closing.
When storing leftovers, cut only the portions needed for immediate service and return the remainder to the freezer as quickly as possible to prevent unnecessary thawing and refreezing cycles that damage texture. Individual portions can be wrapped separately for convenient single servings, while larger remaining portions should be covered with fresh plastic wrap to maintain optimal freshness and prevent absorption of freezer odors.
The Science Behind Perfect Frozen Dessert Creation
Understanding the scientific principles that govern frozen dessert creation empowers home cooks to troubleshoot problems and achieve consistent results because ice cream desserts rely on specific physical and chemical processes that determine final texture and flavor release. The crystalline structure of properly frozen ice cream creates the smooth, creamy texture that melts pleasantly on the tongue, while improper freezing conditions result in large ice crystals that produce grainy, unpleasant textures.
Fat content in ice cream plays a crucial role in both texture and flavor delivery because fat molecules carry flavor compounds and create the rich mouthfeel that characterizes premium frozen desserts. Higher fat content generally produces smoother textures and more intense flavors, while lower fat formulations may require additional stabilizers or techniques to achieve comparable results. The interaction between fat, sugar, and proteins creates the complex matrix that gives ice cream its characteristic properties.
Temperature control affects not only texture but also flavor perception because our taste buds respond differently to foods at various temperatures. Frozen desserts that are too hard suppress flavor release, while those that are too soft may seem overly sweet or lose their structural integrity. The ideal serving temperature allows optimal flavor release while maintaining the textural contrasts that make layered desserts like Buster Bar Ice Cream so appealing.
Troubleshooting Common Challenges
Even experienced cooks occasionally encounter challenges when creating complex frozen desserts, but understanding common problems and their solutions prevents frustration and ensures consistent success. The most frequent issue involves ice cream that becomes too soft during assembly, causing layers to mix together and losing the distinct boundaries that characterize professional presentations. This problem typically results from inadequate pre-chilling or working too slowly during assembly, and the solution involves returning the dessert to the freezer for 15-20 minutes before continuing.
Fudge sauce that hardens too quickly or remains too thin represents another common challenge that affects both assembly and final texture. Sauce that hardens before spreading usually indicates overcooking or insufficient cooling time, while sauce that won’t thicken suggests undercooking or incorrect proportions. The ideal consistency resembles thick honey that spreads easily but doesn’t run off the ice cream surface.
Cracking during cutting often frustrates home cooks who want clean, professional-looking slices for presentation. This problem typically occurs when the dessert is too hard from excessive freezing or when using dull knives that require excessive pressure. The solution involves allowing the dessert to temper at room temperature for 3-5 minutes and using a sharp knife dipped in warm water between cuts.
Additional Inspiration for Dessert Excellence
The success achieved with this Buster Bar Ice Cream recipe provides the foundation for exploring other sophisticated dessert categories that utilize similar techniques and principles because mastery of fundamental skills enables creative expansion into new culinary territories. Consider applying these layering techniques to other frozen desserts, or explore how the same attention to detail enhances other types of sweet treats that require precise execution and quality ingredients.
Seasonal menu planning benefits tremendously from having reliable, crowd-pleasing desserts like this in your repertoire because entertaining success often depends on confident execution of proven recipes. The make-ahead nature of frozen desserts makes them particularly valuable for party planning, while their visual appeal ensures impressive presentation with minimal last-minute effort. These qualities make desserts like Buster Bar Ice Cream essential components of successful entertaining strategies.
Building expertise in dessert preparation opens opportunities to explore complementary menu categories that create cohesive dining experiences. Consider incorporating elements from savory sides or perfect sides to balance rich desserts, or explore flavored dips marinades for creative dessert sauce applications that expand your culinary toolkit.
Conclusion
This remarkable Buster Bar Ice Cream recipe transforms a beloved commercial treat into an extraordinary homemade dessert experience that exceeds expectations through careful attention to technique, quality ingredients, and proper execution. The combination of chocolate cookie crust, premium vanilla ice cream, homemade fudge sauce, and crunchy peanuts creates a symphony of textures and flavors that captures childhood nostalgia while delivering sophisticated adult satisfaction because every element contributes meaningfully to the overall experience.
The versatility and make-ahead convenience of this dessert make it an invaluable addition to any cook’s repertoire, whether preparing for casual family gatherings or elegant dinner parties. The ability to customize flavors and accommodate dietary restrictions ensures that this recipe remains relevant and useful across various occasions and preferences, while the impressive presentation guarantees positive reception from guests of all ages.
Most importantly, mastering this Buster Bar Ice Cream recipe builds confidence and skills that transfer to countless other culinary endeavors because understanding the principles of frozen dessert creation, temperature control, and layering techniques provides the foundation for continued culinary growth and creative expression in the kitchen.

