| Prep Time: | 45 minutes |
|---|---|
| Cook Time: | 60 minutes |
| Total Time: | 9 hours 45 minutes |
| Serves: | 12 |
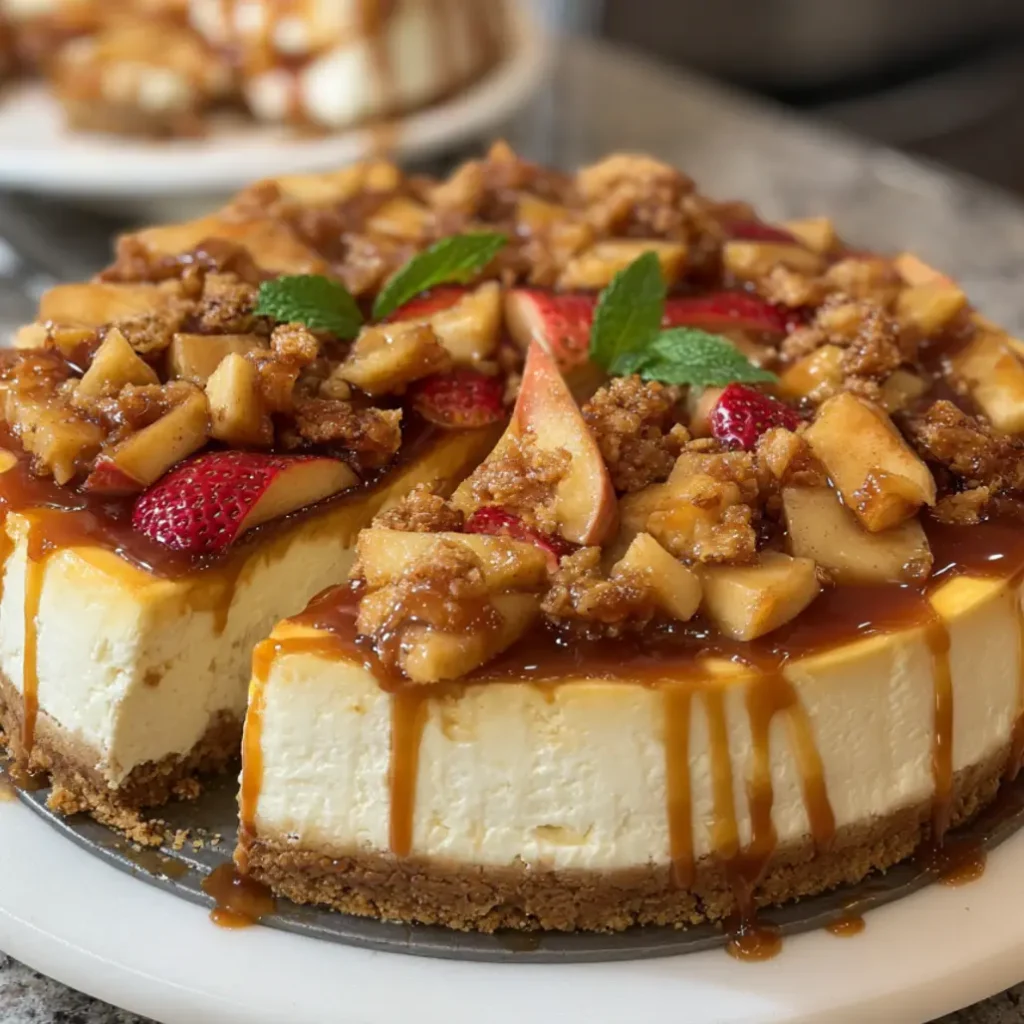
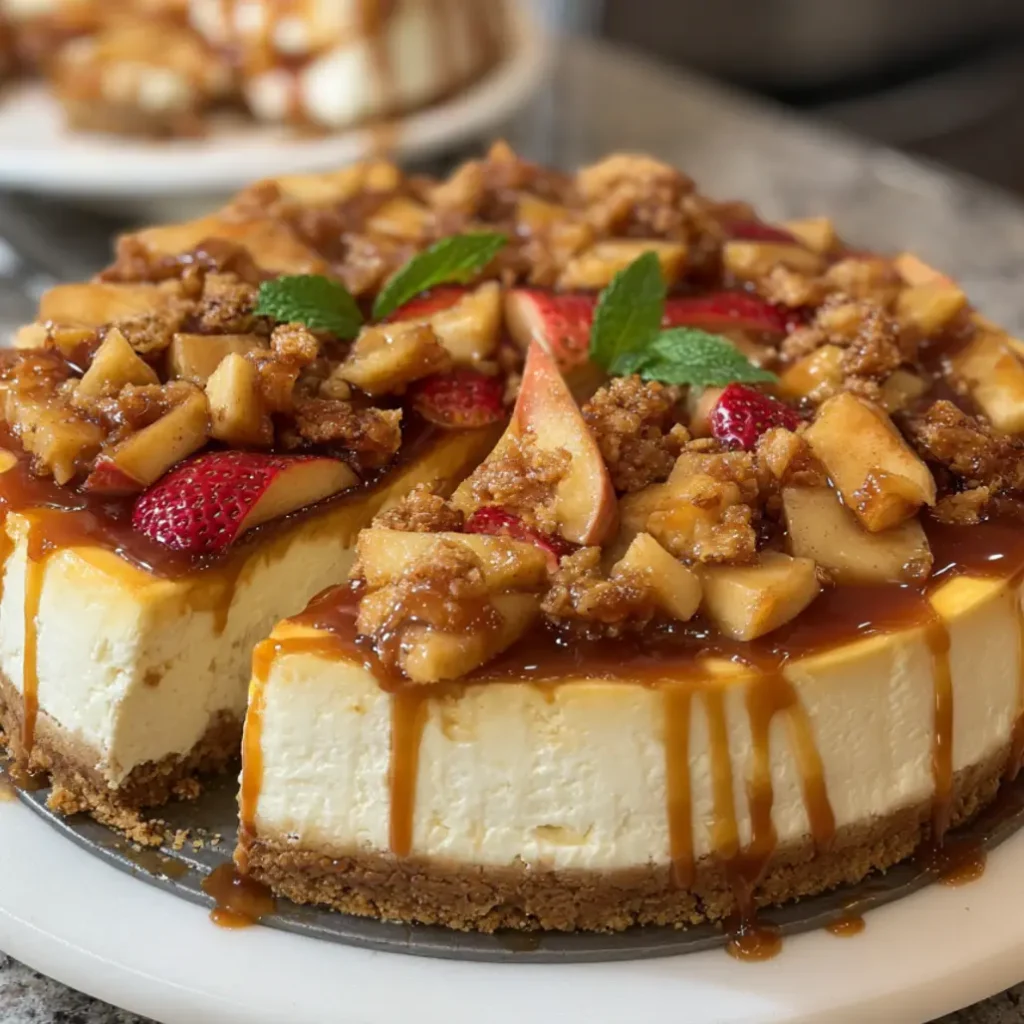
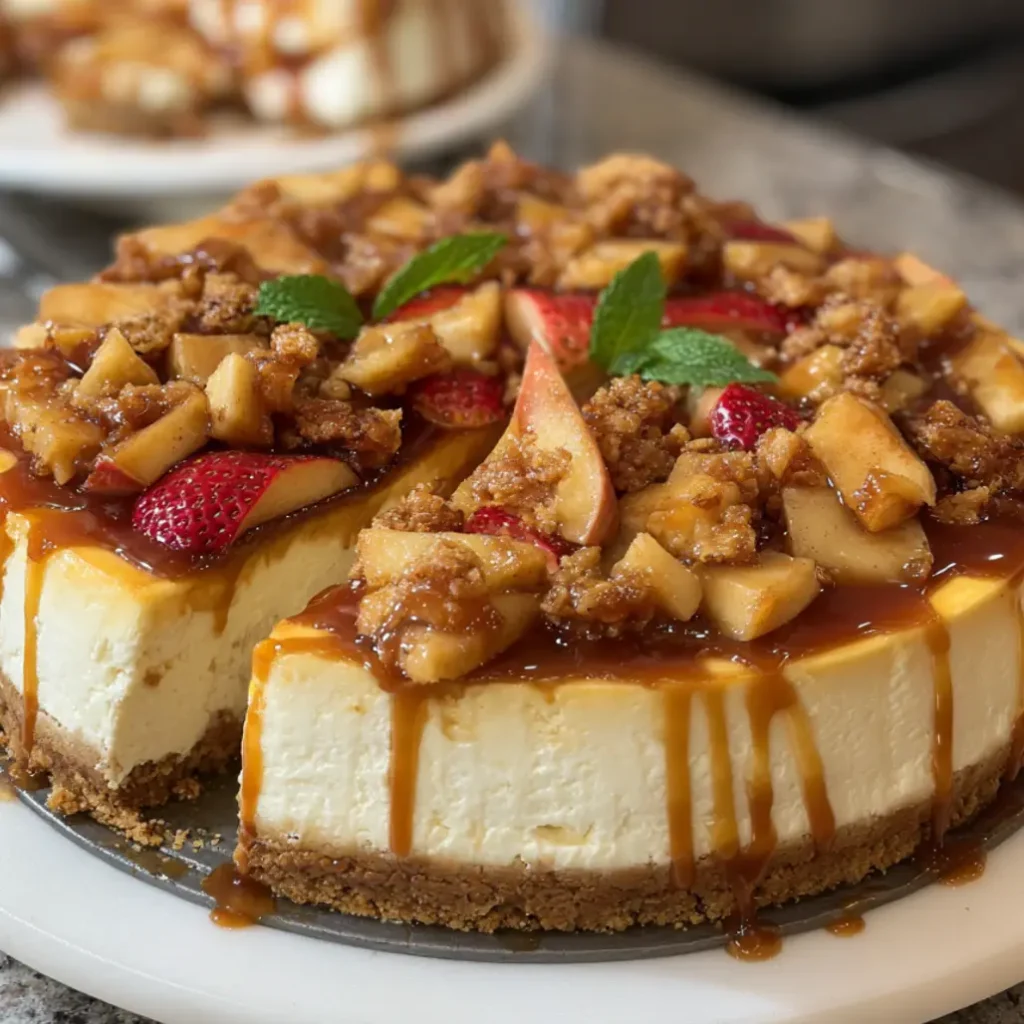
Fall has a way of inspiring the most incredible desserts, and this salted caramel apple pie cheesecake represents everything magical about autumn baking because it combines three beloved desserts into one spectacular creation that will have your guests asking for the recipe before they finish their first bite. The silky smooth cheesecake filling embraces layers of cinnamon-spiced apples while resting atop a buttery graham cracker crust, creating a harmonious balance of textures and flavors that dance together in perfect unity because each component complements the others without overwhelming your palate.
Why This Salted Caramel Apple Pie Cheesecake Works
This extraordinary dessert succeeds because it masterfully balances the richness of traditional cheesecake with the warming spices and fresh flavors of apple pie, while the salted caramel adds that perfect touch of sophisticated sweetness that elevates every single bite. The graham cracker crust provides a sturdy foundation that won’t become soggy because the pre-baking process creates a protective barrier that maintains its delightful crunch throughout the entire baking and chilling process.
The spiced cheesecake filling incorporates just enough cinnamon and nutmeg to complement the apple layers without competing with them because the key to this recipe lies in creating layers that enhance each other rather than fighting for attention. Meanwhile, the apple topping maintains its texture through careful cooking techniques that soften the fruit while preserving enough structure to create pleasant contrast against the creamy cheesecake because overcooking would result in apple sauce instead of beautiful, distinct apple pieces that add visual appeal and textural interest.
Essential Ingredients
For the Graham Cracker Crust:
- 1 1/2 cups graham cracker crumbs (about 12 whole crackers)
- 1/3 cup unsalted butter, melted
- 3 tablespoons granulated sugar
- 1/2 teaspoon ground cinnamon
For the Spiced Cheesecake Filling:
- 32 ounces cream cheese, room temperature
- 1 cup granulated sugar
- 1/2 cup packed light brown sugar
- 4 large eggs, room temperature
- 1 cup sour cream, room temperature
- 2 teaspoons vanilla extract
- 1 teaspoon ground cinnamon
- 1/2 teaspoon ground nutmeg
- 1/4 teaspoon ground ginger
- 1/4 teaspoon salt
For the Apple Pie Layer:
- 4 medium Granny Smith apples, peeled and diced
- 3 tablespoons unsalted butter
- 1/3 cup packed brown sugar
- 1 teaspoon ground cinnamon
- 1/4 teaspoon ground nutmeg
- 1/8 teaspoon ground cloves
- 2 tablespoons apple cider
- 1 tablespoon lemon juice
- 1 tablespoon cornstarch
For the Salted Caramel Sauce:
- 1 cup granulated sugar
- 6 tablespoons salted butter, cubed and room temperature
- 1/2 cup heavy cream, room temperature
- 1 teaspoon vanilla extract
- 1/2 teaspoon sea salt
For the Crumble Topping:
- 1/2 cup old-fashioned oats
- 1/3 cup all-purpose flour
- 1/4 cup packed brown sugar
- 1/4 teaspoon ground cinnamon
- 3 tablespoons cold unsalted butter, cubed
The Art of Creating Perfect Salted Caramel Apple Pie Cheesecake
Success with this elaborate dessert comes from understanding that each component requires different techniques and timing because rushing through any single element will compromise the final result. The cheesecake demands patience and room temperature ingredients because cold cream cheese will create lumps that no amount of mixing can eliminate, while the caramel requires careful attention to prevent burning because sugar can go from perfectly golden to bitter and unusable in mere seconds.Salted Caramel Apple Pie Cheesecake
Temperature control throughout the entire process ensures that your salted caramel apple pie cheesecake achieves the perfect texture because dramatic temperature changes can cause cracking in the cheesecake surface or separation in the caramel. The water bath method provides gentle, even heat that prevents the aggressive cooking that leads to curdled textures and unsightly cracks because the steam creates a humid environment that keeps the cheesecake surface from drying out during the long baking process.
Step-by-Step Instructions
Step 1: Prepare Your Workspace and Pan Preheat your oven to 350°F and tightly wrap the bottom and sides of a 9-inch springform pan with heavy-duty aluminum foil, ensuring complete coverage because even the smallest gap can allow water to seep in during the water bath process. Position an oven rack in the lower third of your oven and bring a large pot of water to boil because you’ll need hot water for the water bath that ensures gentle, even cooking.
Professional Tip: Use at least three layers of heavy-duty foil and press firmly around all seams to create a watertight seal that will protect your cheesecake throughout the baking process.
Key Points: The foil barrier prevents water damage while the lower oven rack position ensures even heat distribution from bottom to top.
Step 2: Create the Graham Cracker Crust Combine graham cracker crumbs, melted butter, granulated sugar, and cinnamon in a medium bowl, stirring until the mixture resembles wet sand because properly moistened crumbs will hold together when pressed while still maintaining their structure during baking. Press this mixture firmly into the bottom of your prepared springform pan, creating an even layer that extends slightly up the sides because this foundation needs to support the weight of the entire cheesecake.
Professional Tip: Use the bottom of a measuring cup or flat-bottomed glass to press the crust evenly, ensuring consistent thickness that will bake uniformly and provide stable support.
Key Points: The crust should feel firm when pressed and hold its shape without crumbling or feeling greasy from excess butter.
Step 3: Pre-Bake the Crust Foundation Bake the crust for 10 minutes until it appears set and lightly golden around the edges because this pre-baking step creates a barrier that prevents the crust from becoming soggy when the cheesecake filling is added. Remove from the oven and reduce the temperature to 325°F while you prepare the filling because the lower temperature will provide the gentle heat necessary for perfect cheesecake texture.
Professional Tip: Allow the crust to cool completely before adding the filling because hot crust can cause the bottom layer of cheesecake to cook too quickly and become grainy.
Key Points: The pre-baked crust should feel dry to the touch and hold together firmly when gently pressed with your finger.
Step 4: Prepare the Spiced Apple Layer Heat butter in a large skillet over medium heat, then add diced apples, brown sugar, cinnamon, nutmeg, cloves, and apple cider, stirring gently to coat all pieces evenly because uniform coating ensures consistent flavor in every bite. Cook for 6-8 minutes until the apples begin to soften but still retain some firmness because they will continue cooking slightly during the cheesecake baking process.
Professional Tip: Whisk the cornstarch with the lemon juice before adding to the apple mixture because this creates a slurry that will thicken the juices without creating lumps.
Key Points: The apples should be tender-crisp with slightly thickened juices that will hold together without being watery or mushy.
Step 5: Master the Salted Caramel Sauce Place granulated sugar in a heavy-bottomed saucepan over medium heat, allowing it to melt without stirring because stirring can cause crystallization that will result in grainy caramel instead of smooth, golden perfection. Watch carefully as the sugar transforms from white crystals to amber liquid, swirling the pan occasionally to ensure even melting because hot spots can cause burning while other areas remain unmelted.
Professional Tip: Keep the butter and cream at room temperature before you begin making caramel because adding cold ingredients to hot sugar can cause dangerous spattering and temperature shock that ruins the smooth texture.
Key Points: The caramel is ready when it reaches a deep amber color and releases a nutty aroma without any traces of white sugar remaining.
Step 6: Complete the Caramel Sauce Remove the caramel from heat and immediately whisk in the room temperature butter pieces, stirring constantly until completely incorporated because the residual heat will melt the butter while preventing the mixture from seizing. Gradually pour in the heavy cream while whisking continuously, then stir in vanilla extract and sea salt until the sauce is completely smooth because proper incorporation creates the silky texture that makes this caramel so irresistible.
Professional Tip: If the caramel hardens when you add the cream, return it to low heat and whisk gently until it melts back into a smooth sauce because temperature shock can be easily corrected with gentle reheating.
Key Points: The finished caramel should coat the back of a spoon and flow smoothly without any lumps or separation that would indicate incomplete mixing.
Step 7: Create the Cheesecake Filling Beat room temperature cream cheese in a large bowl with an electric mixer until completely smooth and free of lumps because any lumps in the cream cheese will remain in the finished cheesecake. Gradually add granulated sugar and brown sugar, beating until well combined, then add eggs one at a time, mixing just until each disappears into the batter because overmixing can incorporate too much air that leads to cracking during baking.
Professional Tip: Scrape down the bowl sides and bottom frequently during mixing because cream cheese can stick to the bowl and create pockets of unmixed ingredients that result in an uneven texture.
Key Points: The filling should be completely smooth and pale in color without any streaks of unmixed cream cheese or sugar granules that indicate insufficient mixing.
Step 8: Add Spices and Final Ingredients Mix in sour cream, vanilla extract, cinnamon, nutmeg, ginger, and salt on low speed just until combined because gentle mixing at this stage prevents overworking the batter while ensuring even spice distribution throughout the filling. The batter should be smooth and creamy with a subtle spice aroma that promises the warm flavors to come because proper spice integration creates complexity without overwhelming the delicate cheesecake base.
Professional Tip: Taste the batter before baking and adjust spices if desired because the flavors will mellow slightly during the long baking process, so slightly more pronounced seasoning at this stage ensures perfect flavor in the finished dessert.
Key Points: The spiced filling should have a uniform color and consistency with no streaks or swirls that indicate incomplete mixing of the spice elements.
Step 9: Assemble the Cheesecake Layers Pour half of the cheesecake filling over the cooled crust, spreading it evenly to the edges because a level base layer ensures even baking and prevents the apple layer from sliding to one side. Spoon the cooled apple mixture evenly over the cheesecake layer, leaving a small border around the edges because the top layer of cheesecake needs to seal properly around the fruit filling.
Professional Tip: Use an offset spatula to spread the filling smoothly because this tool allows you to level the surface without disturbing the crust or creating air bubbles in the batter.
Key Points: Each layer should be evenly distributed with the apple filling completely covered by the final cheesecake layer to prevent burning during the long baking process.
Step 10: Complete the Assembly Pour the remaining cheesecake filling over the apple layer, gently spreading to completely cover the fruit because any exposed apples will brown and potentially burn during baking. Tap the pan gently on the counter to release air bubbles that could create holes in the finished cheesecake because trapped air will expand during baking and create an uneven texture.
Professional Tip: Run a knife through the batter in a figure-eight pattern to release stubborn air bubbles because this technique is more effective than tapping alone for achieving a smooth, even texture.
Key Points: The top layer should be completely smooth and level with no visible air bubbles or uneven spots that could affect the final presentation.
Step 11: Prepare the Crumble Topping Combine oats, flour, brown sugar, and cinnamon in a small bowl, then cut in cold butter using a pastry cutter or your fingers until the mixture resembles coarse crumbs because the cold butter creates the flaky texture that makes this topping so appealing. Spread the crumble on a small baking sheet and bake at 325°F for 15 minutes until golden brown because pre-baking ensures the topping stays crispy even when added to the moist cheesecake surface.
Professional Tip: Chill the crumble mixture for 30 minutes before baking because cold butter creates better texture separation and prevents the topping from becoming dense or cake-like.
Key Points: The finished crumble should be golden brown and feel crispy to the touch with distinct pieces that will maintain their texture when stored and served.
Step 12: Execute the Water Bath Baking Place the assembled cheesecake in a large roasting pan and carefully pour hot water around the springform pan until it reaches halfway up the sides because the water bath provides gentle, humid heat that prevents cracking and ensures even cooking throughout the thick cheesecake. Bake for 55-65 minutes until the center is almost set but still slightly jiggly because residual heat will complete the cooking process during cooling.
Professional Tip: Place a kitchen towel in the bottom of the roasting pan before adding the cheesecake because this prevents the pan from sliding around and creates more even heat distribution throughout the water bath.
Key Points: The cheesecake is done when the edges are set and the center moves only slightly when the pan is gently shaken, with no liquid-like movement that indicates undercooking.
Professional Tips for Success
Understanding the science behind each technique ensures consistent results every time you make this salted caramel apple pie cheesecake because baking is fundamentally about controlling chemical reactions that transform simple ingredients into complex, delicious results. Room temperature ingredients are crucial because they blend more easily and create smoother textures, while cold ingredients can cause lumps and uneven mixing that persist through the entire baking process.
The water bath method might seem intimidating, but it’s actually simple insurance against common cheesecake problems because the steam creates a gentle cooking environment that prevents the rapid temperature changes that cause cracking and curdling. For additional convenience, you can explore various savory sides to complement this rich dessert, or browse through our collection of dessert recipes for more inspiration that will round out your autumn menu planning.
Temperature control throughout cooling is equally important because rapid cooling can cause the cheesecake to contract too quickly and develop cracks, while proper gradual cooling allows the proteins to set gently and maintain their smooth, creamy structure. This attention to detail pays dividends in both texture and visual appeal because a perfectly smooth cheesecake surface provides the ideal canvas for your beautiful apple and caramel toppings.
Creative Variations to Explore
Transform this basic recipe into exciting new variations by incorporating seasonal fruits or different spice profiles that complement the fundamental salted caramel apple pie cheesecake structure while adding your own creative touches. Consider substituting pears for apples because they provide similar texture with a more delicate flavor that pairs beautifully with the warm spices, or add dried cranberries to the apple mixture because their tartness creates wonderful contrast against the sweet caramel elements.
Spice variations can completely change the character of your dessert because different combinations evoke different seasonal memories and cultural influences. Try adding cardamom and orange zest for a Scandinavian-inspired twist, or incorporate maple syrup into the filling and substitute pecans for apples to create a maple pecan version that celebrates different autumn flavors while maintaining the sophisticated appeal of the original recipe.
For those who want to explore complementary flavors, consider serving this dessert alongside options from our snacks appetizers collection, which offers lighter options that can cleanse the palate between rich dessert courses. The texture variations are equally exciting because you can create mini cheesecakes using the same recipe proportions, or transform it into a trifle by layering crumbled cheesecake with apple compote and whipped cream in individual glasses.
Perfect Pairing Ideas
This rich, complex dessert pairs beautifully with beverages and accompaniments that either complement or contrast its intense flavors because successful pairing enhances both elements without overwhelming your palate. Strong coffee or espresso provides the perfect bitter counterpoint to the sweet caramel and spiced apples, while the caffeine helps balance the richness and prevents that overly full feeling that can come with such an indulgent dessert.
For wine enthusiasts, consider late-harvest Riesling or Moscato because their natural acidity cuts through the richness while their subtle sweetness harmonizes with the apple and caramel flavors. Alternatively, a glass of aged bourbon or apple brandy creates a sophisticated adult pairing that emphasizes the autumn spice elements because the warm alcohol notes echo the cinnamon and nutmeg in the cheesecake while adding complexity to the overall dining experience.
Tea lovers should explore options like chai or cinnamon spice tea because these beverages echo the warming spices without competing with the dessert’s flavors, while providing a lighter alternative to coffee for those who prefer gentler caffeine levels. You might also consider browsing our refreshing beverages section for additional pairing inspiration that could surprise and delight your guests with unexpected but harmonious combinations.
Discover More Autumn Delights
Expand your fall baking repertoire by exploring complementary recipes that share flavor profiles or techniques with this salted caramel apple pie cheesecake because mastering related recipes builds your skills while providing variety for seasonal entertaining. Our perfect sides collection offers numerous options for creating complete autumn menus that celebrate the season’s best flavors while providing textural and flavor contrasts that enhance the overall dining experience.
Consider preparing apple cider donuts or spiced pumpkin bread because these lighter options can serve as afternoon treats while your cheesecake chills, providing your guests with autumn flavors in different formats that build anticipation for the main dessert event. The techniques you master while making this cheesecake, such as caramel-making and spice blending, translate directly to many other autumn desserts because these fundamental skills form the foundation of seasonal baking success.
For morning entertainment, explore our breakfast favorites to discover recipes that incorporate similar warming spices and seasonal ingredients, allowing you to create cohesive flavor themes throughout entire days of entertaining. Building these connections between recipes helps you become more confident in menu planning while ensuring that every element of your gathering feels intentionally coordinated and professionally executed.
Storage and Make-Ahead Guidelines
Proper storage techniques ensure that your salted caramel apple pie cheesecake maintains its perfect texture and flavor for several days after preparation because cheesecake actually improves with time as the flavors meld and mature in the refrigerator. Store the completed cheesecake covered tightly with plastic wrap directly against the surface to prevent a skin from forming, then wrap the entire pan with aluminum foil because this double protection prevents the absorption of refrigerator odors that can affect the delicate flavor balance.
The cheesecake will keep in the refrigerator for up to five days, though it’s best consumed within the first three days for optimal texture and flavor because the apple topping can release moisture over time that may affect the crumble’s crispiness. For longer storage, you can freeze individual slices wrapped tightly in plastic wrap and aluminum foil for up to one month because freezing halts the deterioration processes while maintaining most of the dessert’s appealing qualities.
Make-ahead preparation is particularly valuable for this complex dessert because dividing the work across multiple days reduces stress and allows each component to reach its full flavor potential. Prepare the caramel sauce up to one week in advance and store it covered in the refrigerator, then gently reheat before serving because homemade caramel actually develops richer flavor notes over time, while the apple mixture can be prepared up to two days ahead and stored separately until final assembly time.
The Science Behind Perfect Results
Understanding the scientific principles behind this salted caramel apple pie cheesecake empowers you to troubleshoot problems and achieve consistent results because each component involves specific chemical reactions that require precise conditions to succeed. The cream cheese proteins coagulate during baking to create the characteristic firm yet creamy texture, while the eggs provide structure and richness through protein networks that set at specific temperatures when heated gradually and evenly.
Caramel formation involves the Maillard reaction and caramelization processes that transform simple sugars into complex compounds with hundreds of flavor components because these chemical changes create the deep, nutty sweetness that makes caramel so irresistible. The salt in salted caramel doesn’t just add saltiness, but actually enhances the perception of sweetness while suppressing any bitter notes that can develop during the caramelization process because our taste buds respond to salt by becoming more sensitive to other flavors.
The water bath method works because water cannot exceed 212°F at standard atmospheric pressure, creating a consistent, gentle heat source that prevents the protein coagulation problems that occur at higher temperatures because rapid heating causes proteins to clump together rather than forming the smooth gel structure that defines perfect cheesecake texture. This scientific understanding helps explain why shortcuts rarely work in cheesecake making and reinforces the importance of following proper techniques for optimal results.
Troubleshooting Common Issues
Even experienced bakers occasionally encounter problems with complex desserts like this salted caramel apple pie cheesecake, but understanding the causes helps you prevent and correct most issues before they affect the final result because many problems develop from easily corrected technique errors rather than fundamental recipe flaws. Cracks in the cheesecake surface usually result from overmixing the batter, baking at too high a temperature, or cooling too rapidly because these conditions cause uneven expansion and contraction that stresses the delicate protein structure.
If your caramel crystallizes during cooking, remove it from heat immediately and add a tablespoon of corn syrup or honey while whisking vigorously because these ingredients interfere with crystal formation and can often rescue crystallized sugar. Alternatively, you can start over with fresh sugar and add a tablespoon of corn syrup from the beginning because prevention is easier than correction when it comes to caramel-making, though both approaches can yield excellent results with practice and attention to detail.
Soggy crusts typically result from underbaking the initial crust layer or adding filling that’s too warm because both conditions prevent the crust from maintaining its structural integrity throughout the long baking process. If your apple layer releases too much liquid during baking, ensure you’re cooking the apples long enough to evaporate excess moisture and that you’re using firm apple varieties that hold their shape because soft apples can turn to mush and create unwanted moisture that affects both texture and appearance.
Additional Autumn Inspirations
Extend your seasonal baking adventures by exploring recipes that incorporate similar techniques and flavor profiles because mastering one complex dessert opens doors to many related creations that can keep your autumn entertaining fresh and exciting. Consider apple cinnamon rolls with caramel glaze because they use similar spice combinations and caramel techniques in a different format, or explore pumpkin cheesecake variations that substitute seasonal squash for the apple components while maintaining the rich, creamy base that makes this dessert so appealing.
Caramel sauce applications extend far beyond this single dessert because once you master the technique, you can incorporate it into everything from ice cream toppings to cake fillings, creating signature elements that elevate simple desserts into memorable experiences. You might also explore our collection of flavored dips marinades for savory applications that can balance rich desserts in complete menu planning because successful entertaining involves considering the entire flavor journey your guests will experience throughout the meal.
Spiced apple preparations translate beautifully to other desserts and even savory applications because the fundamental technique of balancing fruit, spices, and sweetness appears in everything from chutneys to coffee cake toppings. Building this repertoire of related skills helps you become more confident in improvisation and adaptation because understanding the principles behind successful flavor combinations allows you to create your own variations that reflect personal preferences and seasonal ingredient availability.
Conclusion
This salted caramel apple pie cheesecake represents the pinnacle of autumn dessert making because it combines technical complexity with incredible flavor rewards that justify every minute spent in careful preparation and execution. The inter

