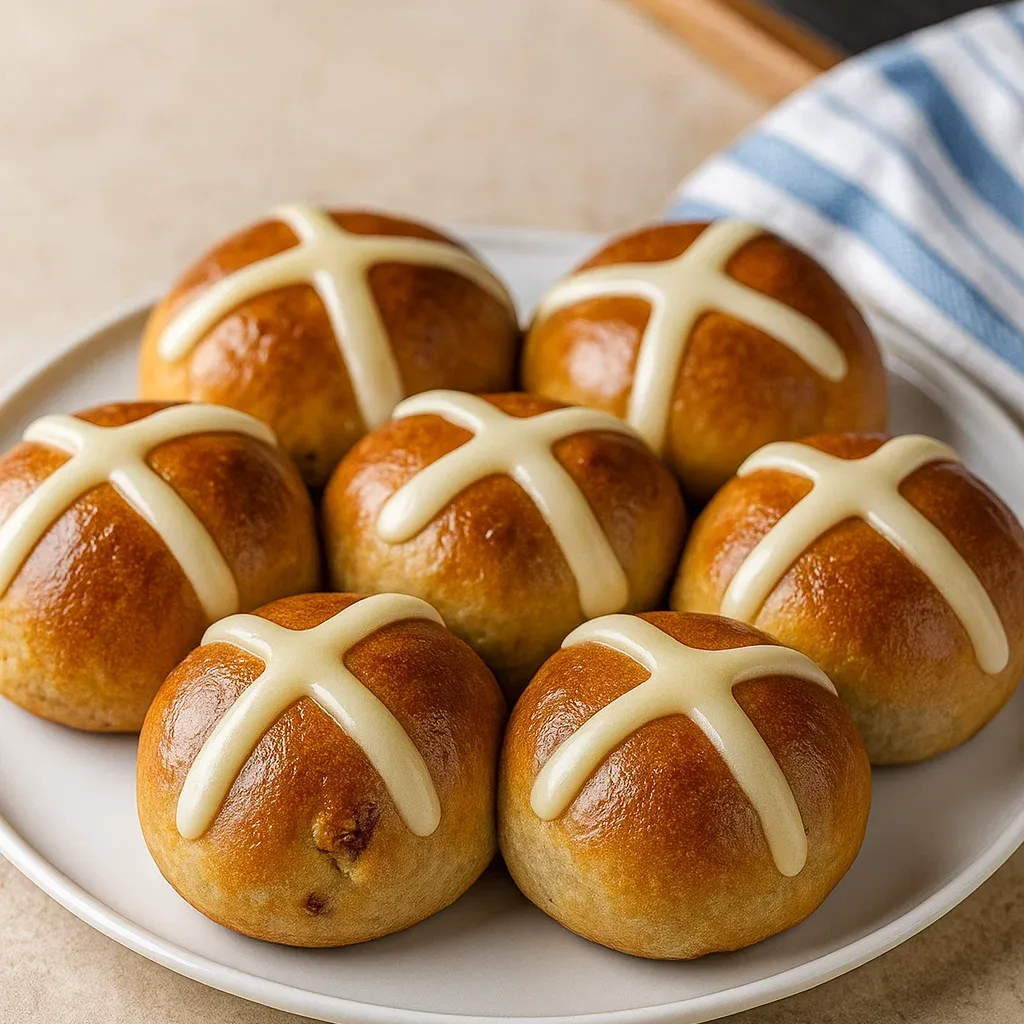
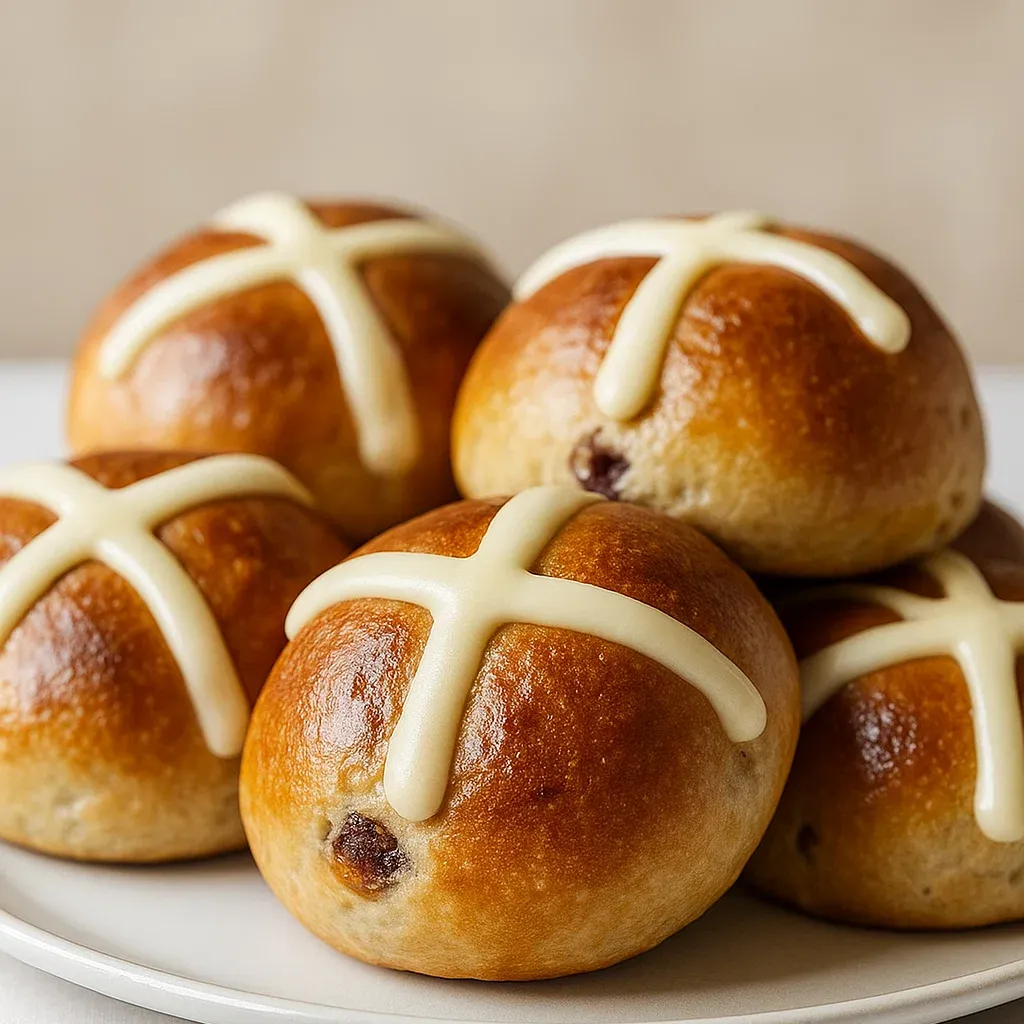
Prep Time: 30 minutes | Rising Time: 2 hours | Bake Time: 25 minutes | Total Time: 2 hours 55 minutes | Makes: 12 buns
There’s something truly magical about the aroma of freshly baked hot cross buns filling your kitchen during Easter season. These tender, spiced buns aren’t just a treat – they’re a beautiful tradition that brings families together around the table. My love affair with hot cross buns began during my first Easter as a newlywed, when I attempted to recreate my grandmother’s recipe from memory and somehow created something even better.
What makes these hot cross buns so special isn’t just their soft, pillowy texture or the perfect balance of sweet spices. It’s the way they transform an ordinary morning into something celebratory, whether you’re enjoying them warm from the oven with butter or toasted the next day with your coffee. These aren’t your store-bought hot cross buns – they’re so much better.
Why These Hot Cross Buns Are Simply Irresistible
The secret to exceptional hot cross buns lies in understanding the delicate balance between sweetness, spice, and texture. Unlike regular dinner rolls, hot cross-buns require a slightly richer dough with more eggs and butter, creating that characteristic tender crumb that makes them so addictive. The gentle warmth of cinnamon and nutmeg, combined with plump raisins, creates a flavor profile that’s comforting yet sophisticated.
What I love most about making hot cross buns is how forgiving they are for home bakers. The dough is soft and easy to work with, and even if your crosses aren’t perfectly straight, they’ll still taste absolutely divine. These hot cross buns have become my go-to recipe for Easter morning, but honestly, they’re too good to save for just once a year.
Premium Ingredients for Perfect Hot Cross Buns
Rich Bread Dough Foundation:
- 4 cups bread flour (or all-purpose flour, but bread flour gives superior texture)
- 2¼ teaspoons active dry yeast (1 standard packet, ensure it’s fresh for best results)
- ⅓ cup granulated sugar (for that gentle sweetness hot cross buns are known for)
- 1 teaspoon fine sea salt (enhances all the other flavors beautifully)
- 1½ teaspoons ground cinnamon (the signature warm spice in hot cross buns)
- ½ teaspoon ground nutmeg (adds depth and traditional flavor)
- ¼ teaspoon ground allspice (for authentic hot cros buns complexity)
Rich Wet Ingredients:
- ¾ cup whole milk, warmed to 110°F (lukewarm to the touch)
- 4 tablespoons unsalted butter, melted and slightly cooled
- 2 large eggs, room temperature for best incorporation
- 1 large egg yolk, reserved from egg wash (adds richness to the dough)
- 1 tablespoon orange zest (fresh zest makes all the difference in hot cross buns)
Fruit and Finishing Elements:
- ¾ cup raisins or currants (I prefer golden raisins for their mild sweetness)
- 2 tablespoons rum or apple juice (for plumping the raisins)
- 1 large egg white, beaten for gorgeous golden egg wash
Traditional Cross Icing:
- 1½ cups powdered sugar, sifted for smoothness
- 3-4 tablespoons fresh orange juice (adjust for perfect consistency)
- 1 teaspoon vanilla extract (enhances the orange flavor)
Step-by-Step Instructions for Bakery-Quality Hot Cross Buns
Preparing Your Foundation:
Step 1: Create the Perfect Fruit Base Begin your hot cross buns by combining the raisins with rum or apple juice in a small bowl. Microwave for 30 seconds until warm, then cover and let stand for 15 minutes. This plumping process ensures your raisins are tender and flavorful throughout your finished hot cross buns, rather than hard little nuggets that detract from the soft texture.
Step 2: Activate Your Yeast Like a Pro In the bowl of your stand mixer, whisk together the warm milk, 1 tablespoon of the sugar, and the yeast. Let this mixture sit for 5-10 minutes until it becomes foamy on top – this is your guarantee that the yeast is active and ready to create those beautiful, airy hot cross buns. If it doesn’t foam, your yeast may be dead, and you’ll need to start over with fresh yeast.
Step 3: Build Your Flavor Foundation In a separate large bowl, whisk together the flour, remaining sugar, salt, cinnamon, nutmeg, and allspice. This dry mixture forms the flavor backbone of your hot cross buns. The even distribution of spices throughout the flour ensures every bite has that perfect warm, aromatic taste that makes hot cros buns so irresistible.
Creating the Perfect Dough:
Step 4: Combine Wet and Dry Ingredients Add the melted butter, whole eggs, egg yolk, and orange zest to your foamy yeast mixture. Using the dough hook attachment, mix briefly to combine. Gradually add the flour mixture, mixing on low speed until a shaggy dough forms. Don’t worry if it looks rough at this stage – proper kneading will transform it into silky hot cross buns dough.
Step 5: Master the Kneading Technique Increase mixer speed to medium and knead for 6-8 minutes until the dough is smooth, elastic, and slightly tacky but not sticky. The dough should pull away from the sides of the bowl and pass the windowpane test – when you stretch a small piece, it should be thin enough to see through without tearing. This proper gluten development is crucial for tender hot cross buns.
Step 6: Incorporate the Plumped Fruit Drain your plumped raisins and gently fold them into the dough during the last minute of kneading. Be careful not to overmix once the fruit is added – you want to distribute it evenly without bursting the raisins, which would affect both the appearance and texture of your hot cross buns.
First Rise and Shaping:
Step 7: Perfect the First Rise Transfer your dough to a greased bowl, turning to coat all sides. Cover with a damp kitchen towel or plastic wrap and place in a warm, draft-free spot. Let rise for 1-1.5 hours until doubled in size. The dough should feel light and airy when gently poked. This first rise develops the flavor and structure that makes hot cros- buns so special.
Step 8: Shape Professional-Looking Buns Turn the risen dough onto a lightly floured surface and gently punch down to release air bubbles. Divide into 12 equal portions using a kitchen scale for uniformity – each piece should weigh about 3 ounces. Shape each portion into a smooth ball by tucking the edges underneath and rolling gently on the work surface. Proper shaping ensures your hot cross buns bake evenly and look bakery-perfect.
Final Rise and Baking:
Step 9: Arrange for Perfect Baking Place shaped buns on a parchment-lined baking sheet, spacing them about 2 inches apart. They’ll expand during the second rise and baking, creating that classic connected appearance that makes hot cross buns so appealing. Cover with a damp towel and let rise for 45-60 minutes until puffy and nearly doubled in size.
Step 10: Create the Golden Finish Preheat your oven to 375°F during the last 15 minutes of rising. Gently brush the tops of your hot cross buns with beaten egg white, being careful not to deflate them. This egg wash creates that beautiful golden, glossy finish that makes professional hot cros buns so visually appealing.
Step 11: Bake to Golden Perfection Bake your hot cross buns for 20-25 minutes until deep golden brown and hollow-sounding when tapped on the bottom. The internal temperature should reach 190°F. If they’re browning too quickly, tent with foil. Let cool on the baking sheet for 10 minutes before transferring to a wire rack.
Creating the Iconic Cross:
Step 12: Master the Perfect Icing Cross While the buns cool, whisk together powdered sugar, orange juice, and vanilla until smooth and pipeable. The consistency should be thick enough to hold its shape but thin enough to pipe easily. Transfer to a piping bag or plastic bag with the corner snipped off. Pipe crosses on each bun in one continuous motion for the most authentic hot cross buns appearance.
Pro Tips for Hot Cros Buns Perfection
Temperature Control: Keep your ingredients at proper temperatures throughout the process. Too-hot milk can kill yeast, while too-cold ingredients won’t rise properly.
Make-Ahead Magic: Shape your hot cross buns and complete the second rise, then refrigerate overnight. Bake directly from the fridge the next morning, adding 5-10 minutes to the baking time.
Storage Success: Store finished hot cross buns in an airtight container for up to 3 days. They freeze beautifully for up to 3 months – thaw at room temperature and refresh in a 300°F oven for 5 minutes.
Texture Perfect: If your hot cross-buns seem dense, you may have added too much flour or over-kneaded after adding fruit. The dough should remain slightly tacky.
Perfect Occasions for Hot Cross Buns
While traditionally associated with Easter, these hot cros buns are too delicious to limit to just one holiday. They make an elegant addition to any brunch spread and are absolutely divine with afternoon tea. I love making extra batches to give to neighbors during the Easter season – they always generate requests for the recipe.
Complete Your Easter Celebration:
Transform your hot cross buns into part of a memorable Easter feast with these complementary recipes:
- Breakfast Favorites – Discover amazing brunch recipes like fluffy pancakes and egg casseroles that pair beautifully with fresh hot cross-buns for the perfect Easter morning spread
- Irresistible Desserts – Explore our collection of Easter desserts including carrot cake and lemon tarts that complement the warm spices in these hot cross buns
- Refreshing Beverages – Try our flavored coffees, teas, and fresh juices that enhance the dining experience when serving these delightful hot cross buns
- Perfect Sides – Find elegant brunch sides like roasted vegetables and fresh fruit salads to round out your Easter menu featuring homemade hot cross buns
Storing and Serving Your Hot Cross Buns
Fresh hot cros buns are best enjoyed within 2-3 days of baking. Store them in an airtight container at room temperature to maintain their soft texture. For longer storage, wrap individual buns in plastic wrap and freeze for up to three months. When ready to enjoy, thaw at room temperature and warm briefly in a low oven to refresh.
Serve your hot cross- buns warm, split in half and buttered, or toasted lightly for extra texture. They’re also delicious used in bread pudding or French toast if you have any left over – though in my experience, that rarely happens!
Creative Variations for Your Hot Cross Buns
Once you master this basic recipe, feel free to experiment with different dried fruits like cranberries, chopped apricots, or mixed candied peel. Some bakers love adding a touch of cardamom or ginger to the spice mixture for extra warmth. You can also make mini hot cros buns for afternoon tea parties – just reduce the baking time to 15-18 minutes.
For a modern twist, try adding chocolate chips instead of raisins, or experiment with different citrus zests like lemon or lime. The beauty of hot cross buns is their adaptability while maintaining that essential comforting character that makes them so beloved.
Why These Hot Cros Buns Will Become Your Easter Tradition
There’s something special about the process of making hot cross-buns that goes beyond just baking bread. It’s the anticipation during the rising, the incredible aroma that fills your home, and the satisfaction of creating something beautiful and delicious from simple ingredients. These aren’t just buns – they’re edible memories in the making.
Every time I make hot cross buns, I’m reminded of why certain traditions endure. They bring people together, create lasting memories, and offer a moment of sweetness in our busy lives. Whether you’re starting a new tradition or continuing a family legacy, these hot cros buns will deliver the perfect combination of taste, texture, and meaning that makes them truly special.
The next time Easter approaches, or whenever you want to bring a little extra warmth to your kitchen, remember these incredible hot cross buns. They’re proof that some of the best things in life are worth taking time to create properly, and the rewards – both in taste and in the joy of sharing – are immeasurable.
Looking for more special occasion recipes? Explore our Dinner Delights and Tasty Snacks to create memorable meals that showcase these beautiful homemade hot cross buns.

